Home Tips by Tom Feiza
Any home, whether it’s old or new, can suffer the heartbreak of “the squeak.” With a little knowledge, a few inexpensive materials, and some do-it-yourself effort, we can eliminate most squeaks in our homes.
We will focus on floor squeaks, since they are the most common and most annoying. The same principles and corrections apply to stairs.
What Makes the Noise?
Squeaks in homes occur when surfaces rub against each other. It could be a wood floorboard joint rubbing, a subfloor board rubbing on a nail, or movement between any two adjacent surfaces. The key here is movement. Eliminating the movement eliminates the squeak.
What Causes the Movement?
Most often, movement occurs at loose fits in a home caused by shrinkage of wood. Wood is a natural material, and as its moisture content changes, it expands or contracts. A two-story wood framed home can shrink 5/8 of an inch within a year of its completion. As wood dries and shrinks, gaps and cracks develop and fasteners become loose.
Some movement is caused by settling and loading of structural members. As wood is loaded, it can slightly compress and move. A load on a floor joist will actually cause a slight sag in the center of the floor.
Older homes are subject to more squeaks because their construction uses a greater percentage of natural wood materials. Natural wood is more prone to expansion and contraction compared to modern manufactured wood-based products. Older homes are subject to more air infiltration, which dries the wood and makes it more likely to move. Normal wear and tear also takes its toll on an older home.
Identify the Squeak and its Location
To squelch a squeak, creak or groan, we need to identify the cause of the movement. Often, wood movement is visible. You might pinpoint it by having one person walk or jump lightly on the offending floor while someone else looks and listens from below and marks the location of the noise and movement.
Work from Below—Movement at the Joists
You may find that floorboards have moved in relation to the joist framing; nails have loosened; and floorboards are rubbing against a nail fastener or another floorboard.You can correct this problem with either of two simple methods.
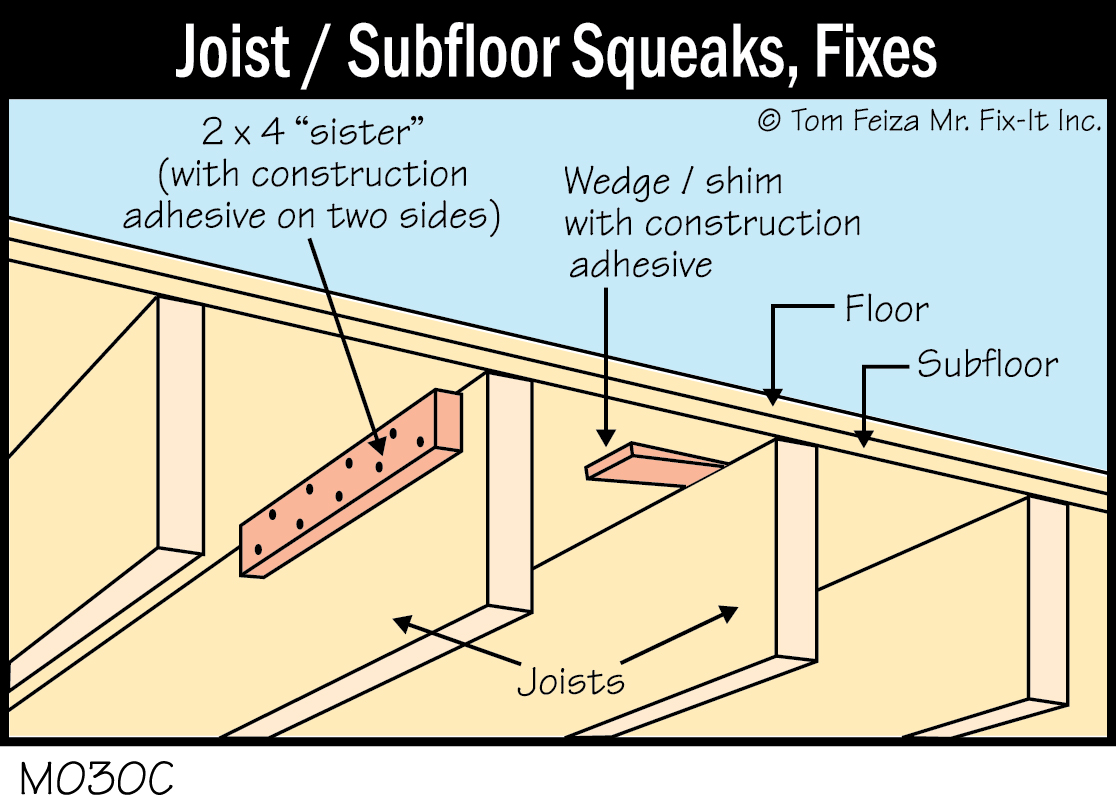
Often the quickest and easiest fix is to “sister” a short length of 2 x 4 or 2 x 6 parallel to the loose floorboards and joist. Liberally coat the 2 x 4 on two sides with construction adhesive (such as Liquid Nails) applied with a caulk gun. Attach the board to the joist with a few long deck screws driven upward and angled into the joist. This pulls the patch up, into the floorboards.
The construction adhesive fills voids and laterally welds the lumber to the joist and subfloor. Construction adhesive does not shrink as it cures, so it creates a strong and solid bond.
In areas with gaps between the joists and subfloor, you can also gently tap wood shims coated with construction adhesive into the gaps. Don’t drive too hard or you might separate the subfloor from the joists and complicate the problem.
You can try to squeeze construction adhesive into the joist/subfloor joint. Apply the material like caulk and try to force it into any opening or gap. This will only work if there is a minor amount of movement.
Work from Below—Movement Between the Joists
If the subfloor is cracked or shows movement between joists, you can correct the problem by installing bridging between the joists at the area of movement. Bridging is 2 inch wide framing lumber that is tightly installed perpendicular to the joists. The bridging should be secured with construction adhesive on three sides as well as long deck screws or common nails through the joists into the ends of the bridging.

The bridging helps support the subfloor and also stiffens joists as it transfers load and potential movement from joist to adjacent joist. Bridging can be installed in several adjacent areas to stiffen and reinforce a section of the floor.
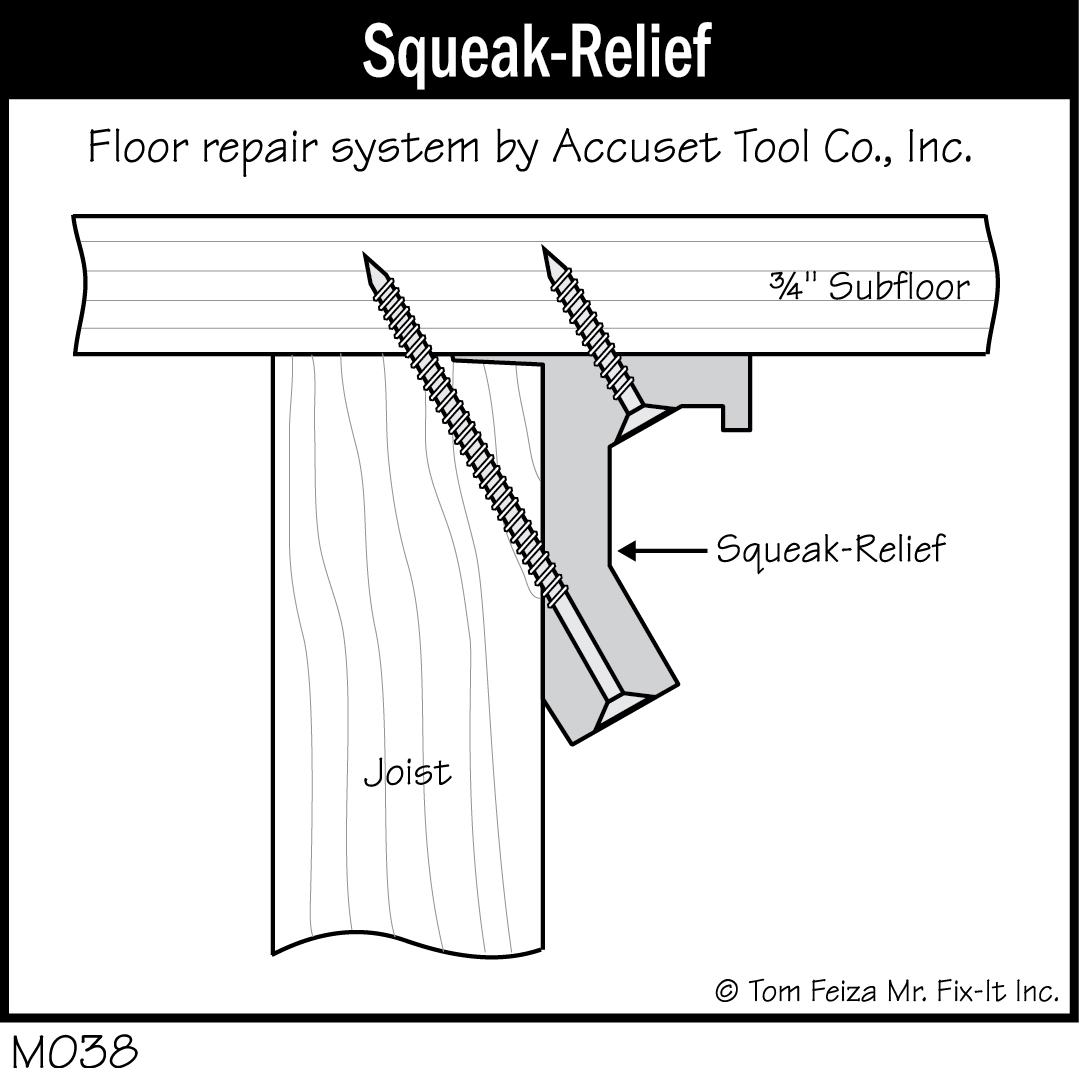
Special Bracket from Below
Squeak-Relief provides a special aluminum bracket and matching screws and nails specifically designed to secure a subfloor to joists from below. The bracket fits tightly at the joist/subfloor joint, and the screws draw the joint tight without the worry of driving a screw through the finished floor. For a larger area of movement, you will need several brackets. You can find more information about Squeak-Relief through ATCI Consumer Products, (800) 343-6129, www.worksavers.com.
Hardwood Floor Squeaks from Below
If solid hardwood floorboards are moving and squeaking but the subfloor looks secure from below, you can attempt to drive screws up through the subfloor boards into the hardwood. You must measure or carefully estimate the total thickness of the wood floor and subfloor. Try to find an edge or penetration where you can make a measurement. Normally this total thickness is 1½ inches, and a 1¼-inch-long screw can be used, but be careful—if the screw is too long, it will penetrate the finished floor.
Select a deck screw, and drill a clearance hole just a bit larger than the diameter of this screw into the subfloor. The clearance hole prevents screw threads from biting too tightly into the subfloor. Drill a small pilot hole into the hardwood floor through the clearance hole. Then, with a heavy weight holding down the wood floor, drive your deck screw (with a washer below the head) up into the pilot hole. It may take several screws in several locations to secure this area. Ultimately, the process should pull the hardwood tightly to the subfloor.
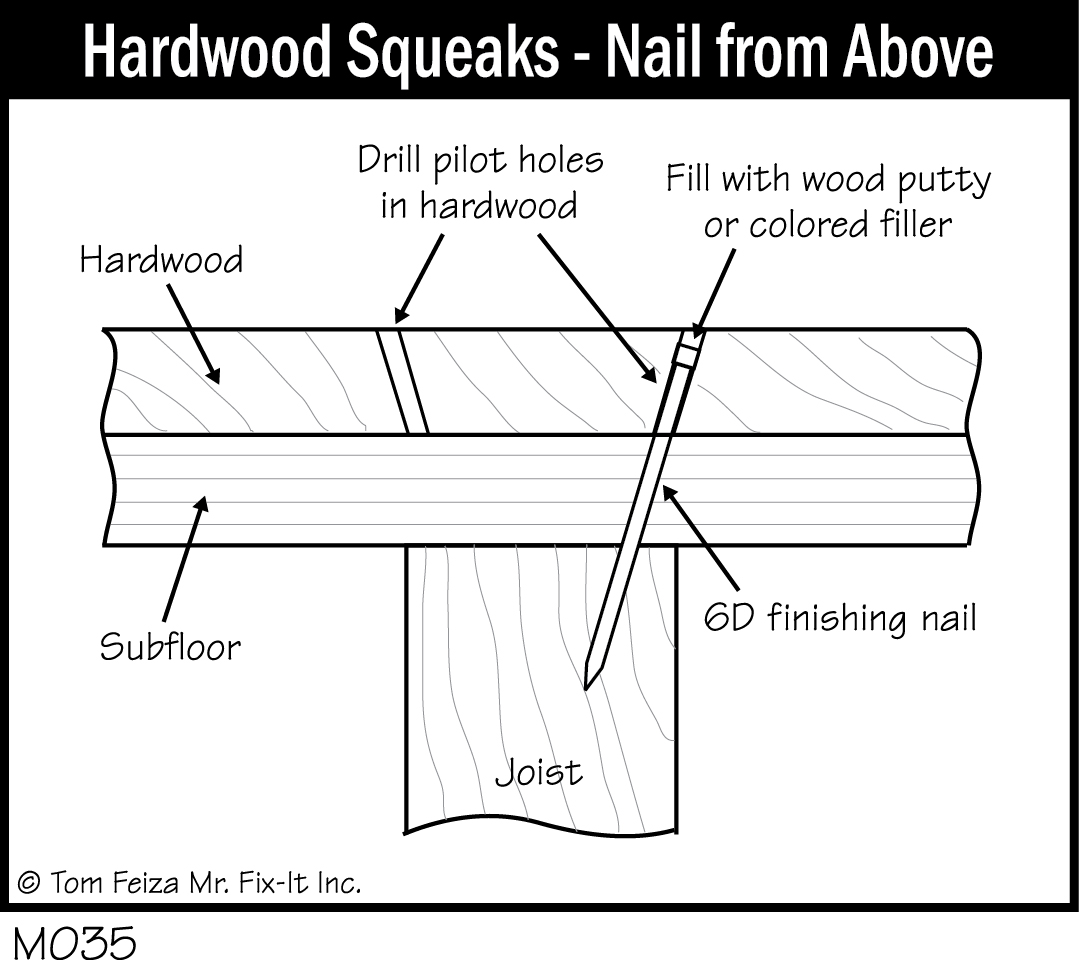
Hardwood Floor Squeaks from Above
You can also work from above to fix loose hardwood floorboards. Drive finishing nails at an angle through the hardwood floor into the subfloor and joists. Often, to keep the wood from splitting or the nail from bending, you must first create a pilot hole before driving a nail through the hardwood. When you are finished, the small nail hole can be patched with colored wood putty.
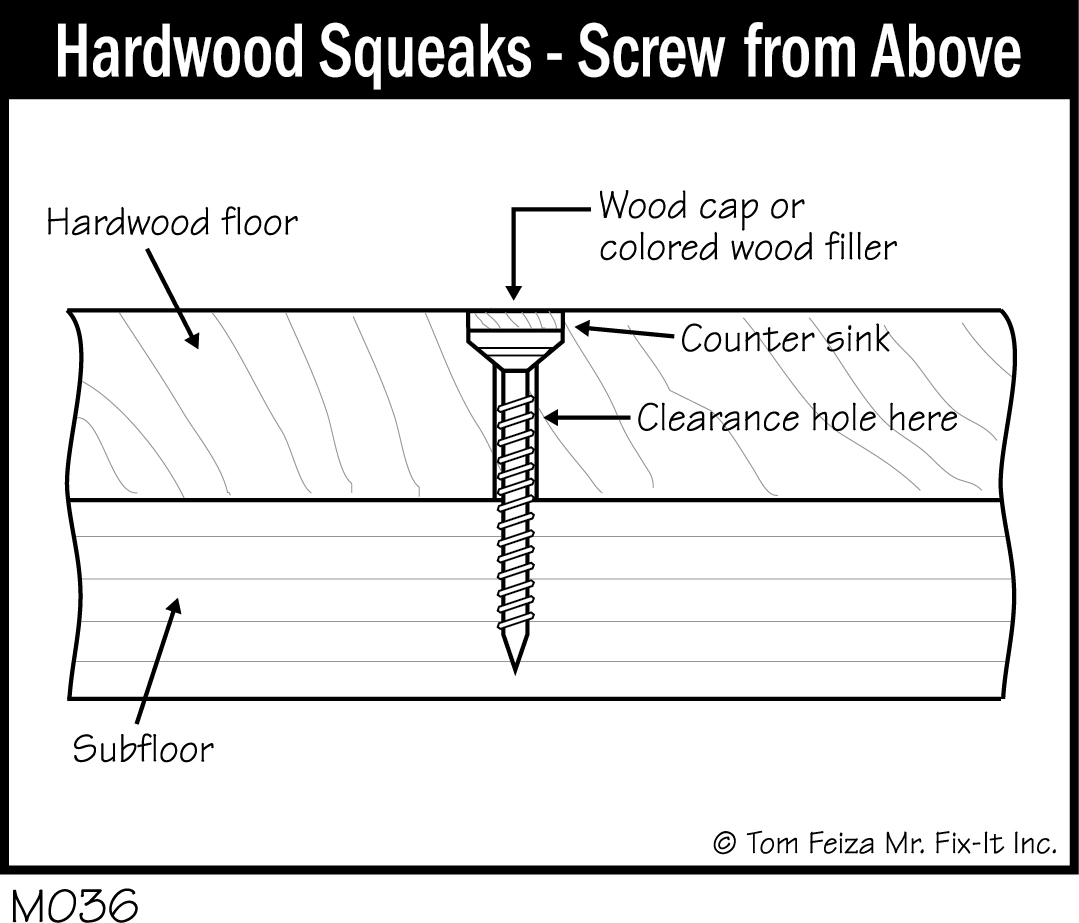
You can also drive deck screws or trim screws through the hardwood and into the subfloor or the subfloor and joists. Trim or finishing screws look like drywall screws with very small heads. You must first drill a clearance hole bigger than the diameter of the screw through the hardwood, and you should drill a countersink hole the size of the screw head. The hole from a deck screw can be filled with a wood plug or colored wood putty. A finishing screw has such a small head that it creates a very small hole which is easily filled with wood putty.
With either method of working from above, you must drive several screws or nails over the areas of movement.
Hardwood Floor—Special Screws from Above
You can also secure hardwood floorboards from above with a special screw and bracket called Counter Snap from ACTI Consumer Products, (800) 343-6129, www.worksavers.com
With Counter Snap, you first drill a pilot hole, then drive a screw through a small bracket that holds the screw head away from the floor. The screw secures the hardwood to the subfloor. This special screw has a notch in its shank, and after you have driven in the screw as far as necessary, you break off the screw at this score line, just below the surface of the hardwood. The remaining hole in the floor is almost invisible.

No Access from Above or Below with Carpeting
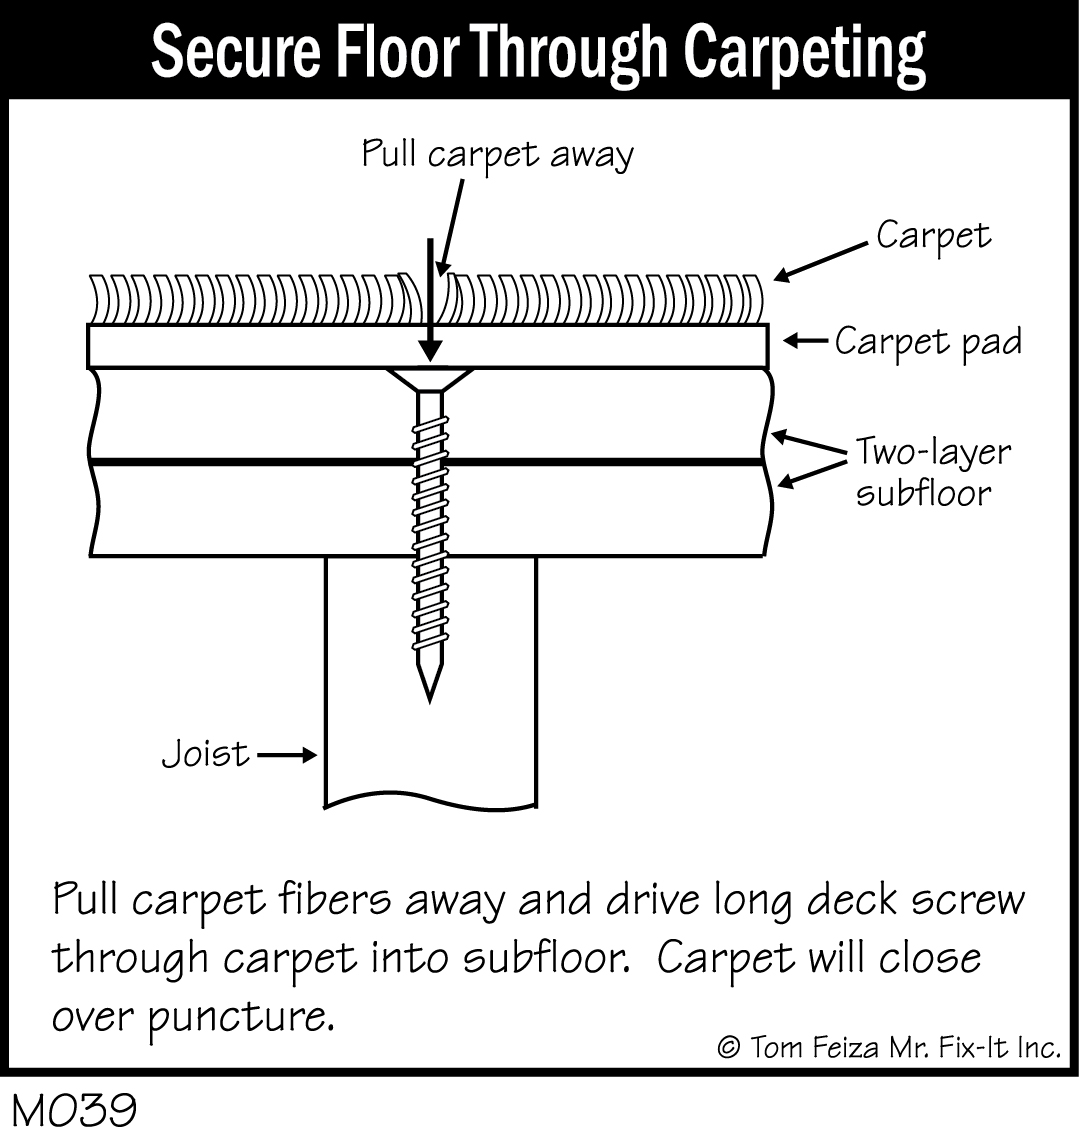
At times there is just no access to the offending floor squeaks. In many cases, you must simply wait until you replace the carpeting or vinyl and then screw the subfloor to the joists. Once the floor covering is removed, use many, many long deck screws to pull the subfloor to the joist. You could drive a screw every 6 inches along the framing.
You can attempt to work through the carpeting, but there is a slight risk to the carpet fabric, and it is almost impossible to locate floor joists. This will work if you can locate joists or if there are two layers of subflooring. You can attempt to locate the floor joist by drilling a small hole through the carpet and subfloor and then using a thin wire to search for the edge of the joist.
Another way to locate a floor joist through carpeting would be to use a high-quality deep-scanning stud finder. You would need to support the stud finder on still, flat cardboard as you scan the surface. I have had some luck with this method on thinner carpet.
After you locate the floor joists, you can attempt to secure the subfloor through the carpet. Pull the carpet fibers back and drill a small pilot hole through the subfloor at an angle into the joist. Follow up with a deck screw, pulling the subfloor to the joist and pulling the head of the screw through the carpet and pad. There is some risk to the carpet, so try to keep the fibers away from the screw as it twists into the wood.
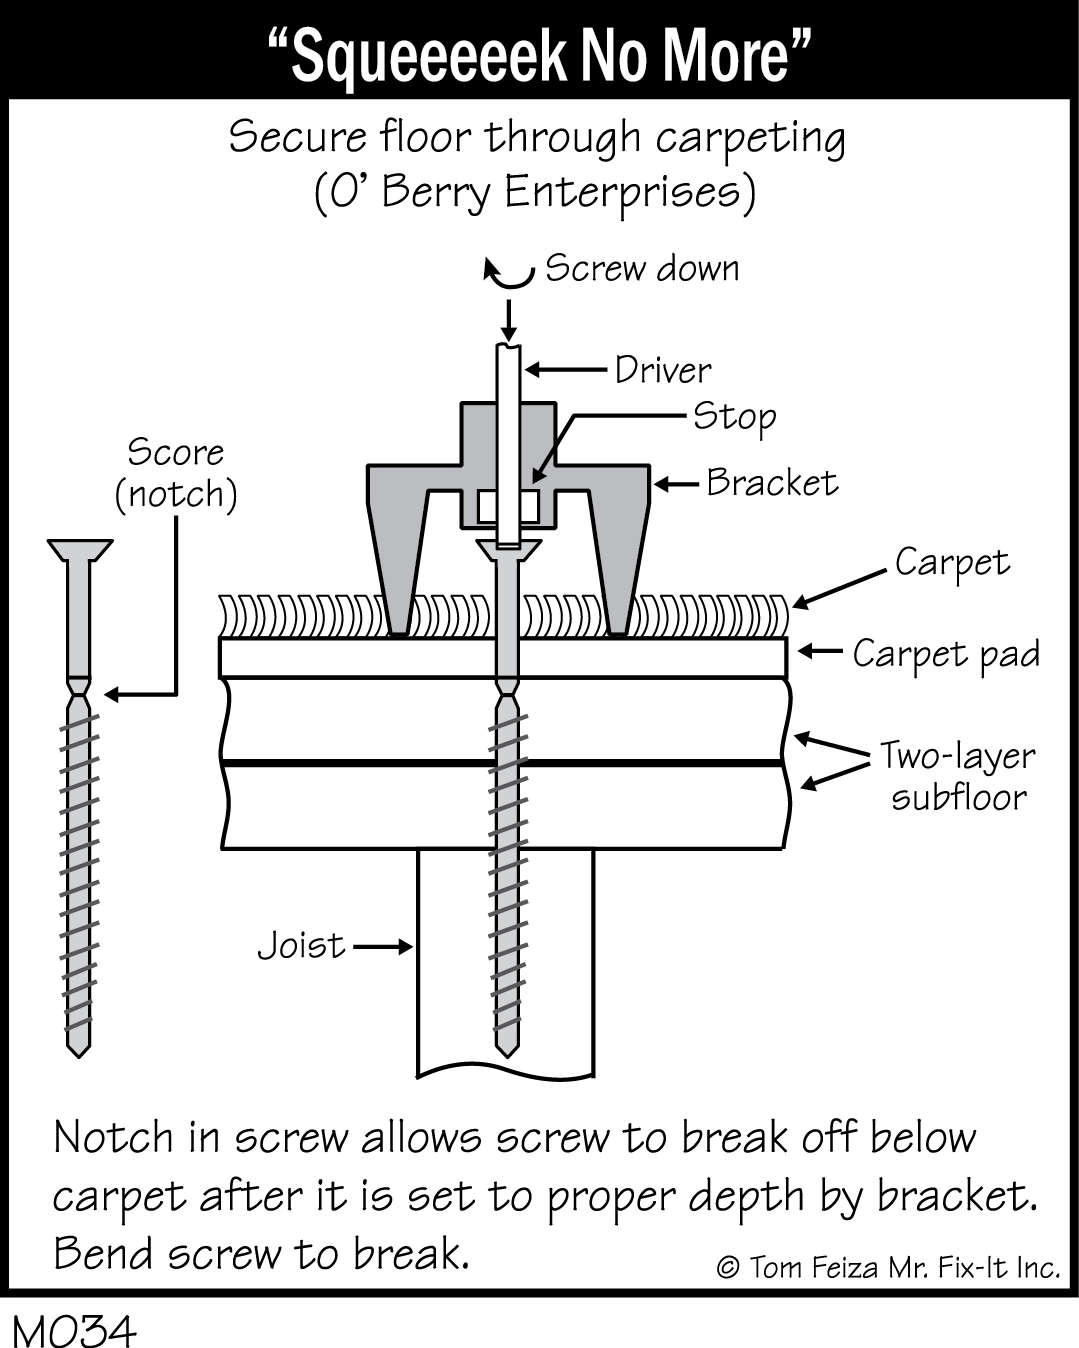
Special Screws from Above
A screw and bracket made for securing a floor through carpeting is Squeeeeek No More, available from ATCI Consumer Products, (800) 343-6129, www.worksavers.com.
The screw is driven through a bracket, directly through the carpeting, and set partially into the floorboards. The screw is then broken off at a score line, just below the top of the subfloor.
They’ll Be Back
Once you understand the mechanism for squeaks and the basics of framing and construction, you can approach almost any squeak. Special screws and brackets can simplify the repair. Remember that since wood is a natural product, it might continue to move and squeak despite your best efforts. In that case, you may have to resign yourself to the thought that a squeak helps you keep track of the teenagers late at night.