
Insulate Your Attic – But Don’t Stop There
Home Tips by Tom Feiza
With energy costs increasing every year, insulating your home could be an excellent way to save natural resources and ease the strain on your pocketbook. The project sounds simple: add a little insulation, and the savings roll on. Most of us certainly can save energy in our homes, but the project is much more complex than just blowing a bunch of insulation into the attic. Modern homes are complex, interactive systems. Insulation must be added with a lot of thought and planning.
Done right, insulation reduces heat loss and increases the comfort of your home. Once it is in place, it requires no ongoing maintenance. Done incorrectly, it will not increase energy efficiency; instead, you will waste your money and might even cause serious moisture damage to your home. So where should you start?
You need to understand a few common terms and have a little engineering know-how before installing insulation or hiring a contractor for the project. You must plan for the specific work that needs to be done, and you must consider the type of work that will be most beneficial for your home.
In this article I’ve simplified the information so it is easier to understand from a heating climate perspective. If you are the detailed-oriented science-loving type, check the references listed in this article.
The Science of Insulation
Heat flows by radiation, conduction and convection.
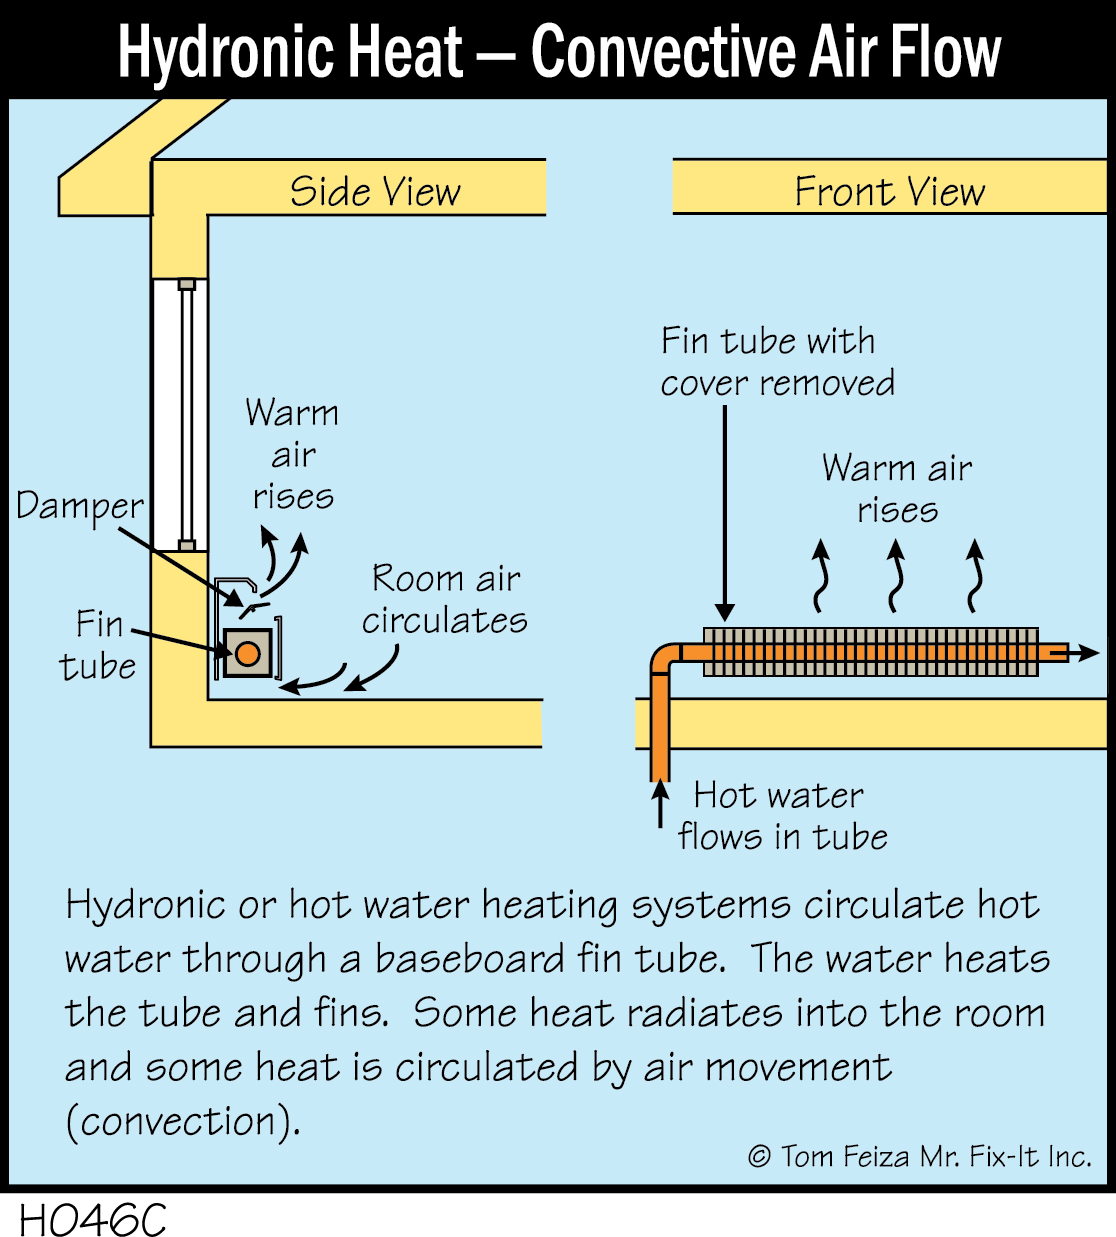
Radiation is the mechanism that delivers heat from the sun to the earth. The sun radiates heat through the air. In a home, a hot water radiator or fin-tube “radiates” a little heat into the room; most of the heat from a fin-tube is transferred through convective airflow. We feel warm near a fire because heat is radiated from the flame to our skin. A small portion of the heat loss from a home is due to radiation from its exterior.
Conduction is the movement of heat through a solid substance. Some materials that are good conductors include metals, wet dirt, and concrete; they have low R-values, which means they have low resistance to heat flow. Heat moves easily through an aluminum window frame. With frigid outdoor temperatures, the inside of an aluminum window frame can actually become covered with ice as heat flows outside and moisture condenses and freezes on the cold frame.
Wood, dry snow, and fluffy fiberglass are good insulators. A wood-framed window allows less heat to flow to the cold outside, and it is very unlikely that ice will form on the inside of a wood frame.
Our winter gloves are built of a sturdy outer shell of nylon or leather to stop air movement and prevent direct contact with cold surfaces that conduct heat from our skin. The gloves may be lined with a fluffy, soft material to further prevent conduction of heat.
Heat flows with air movement; this is a type of convective heat movement. Open the door and the heat blows out while the cold blows in.
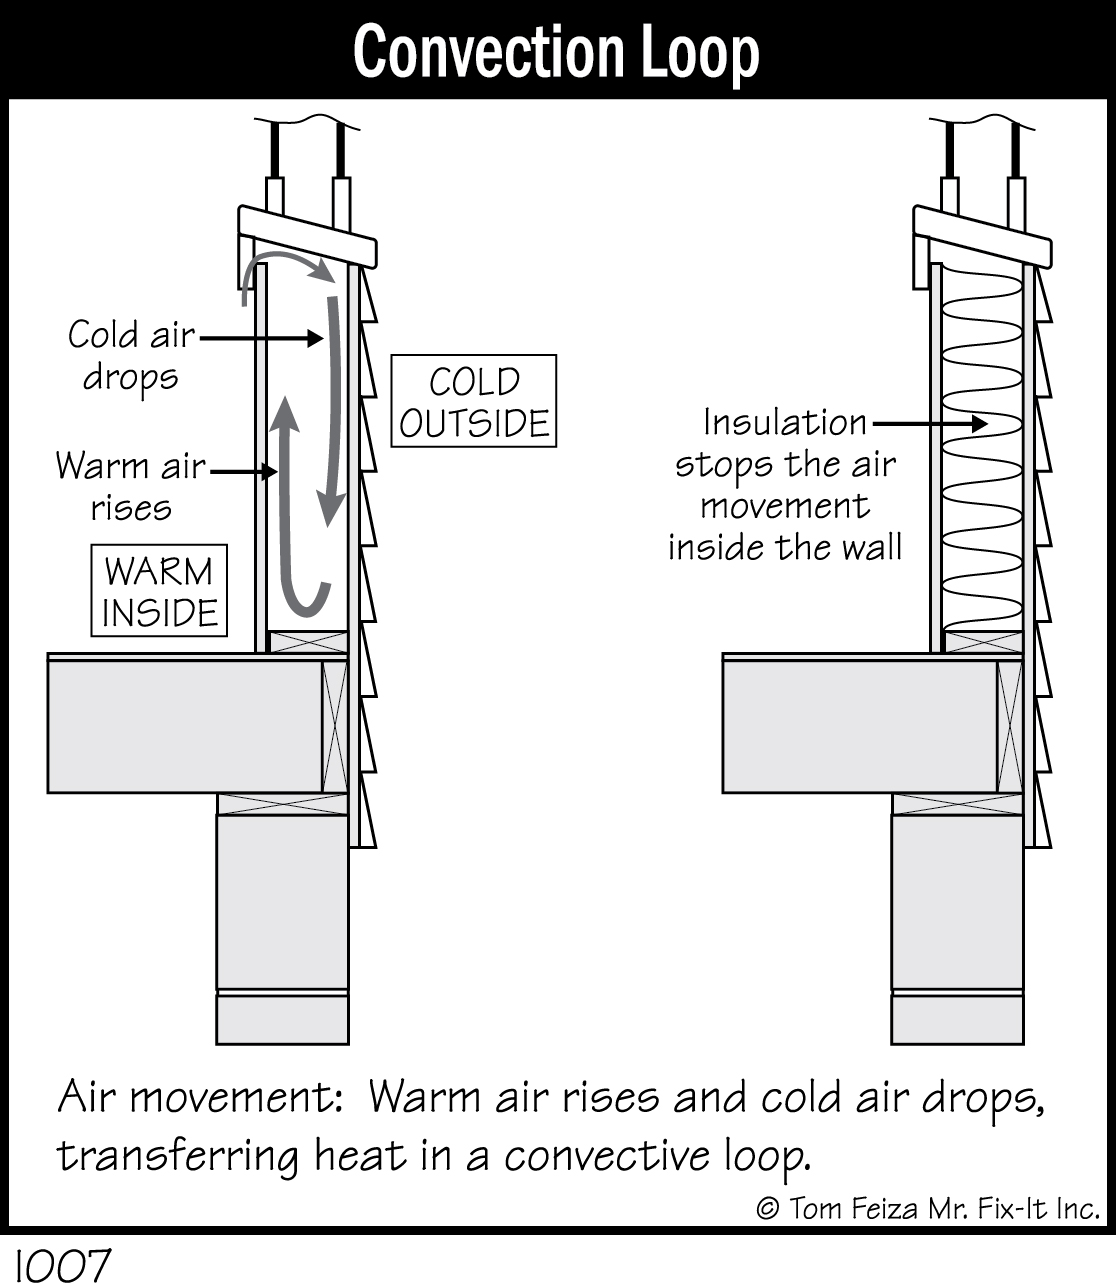
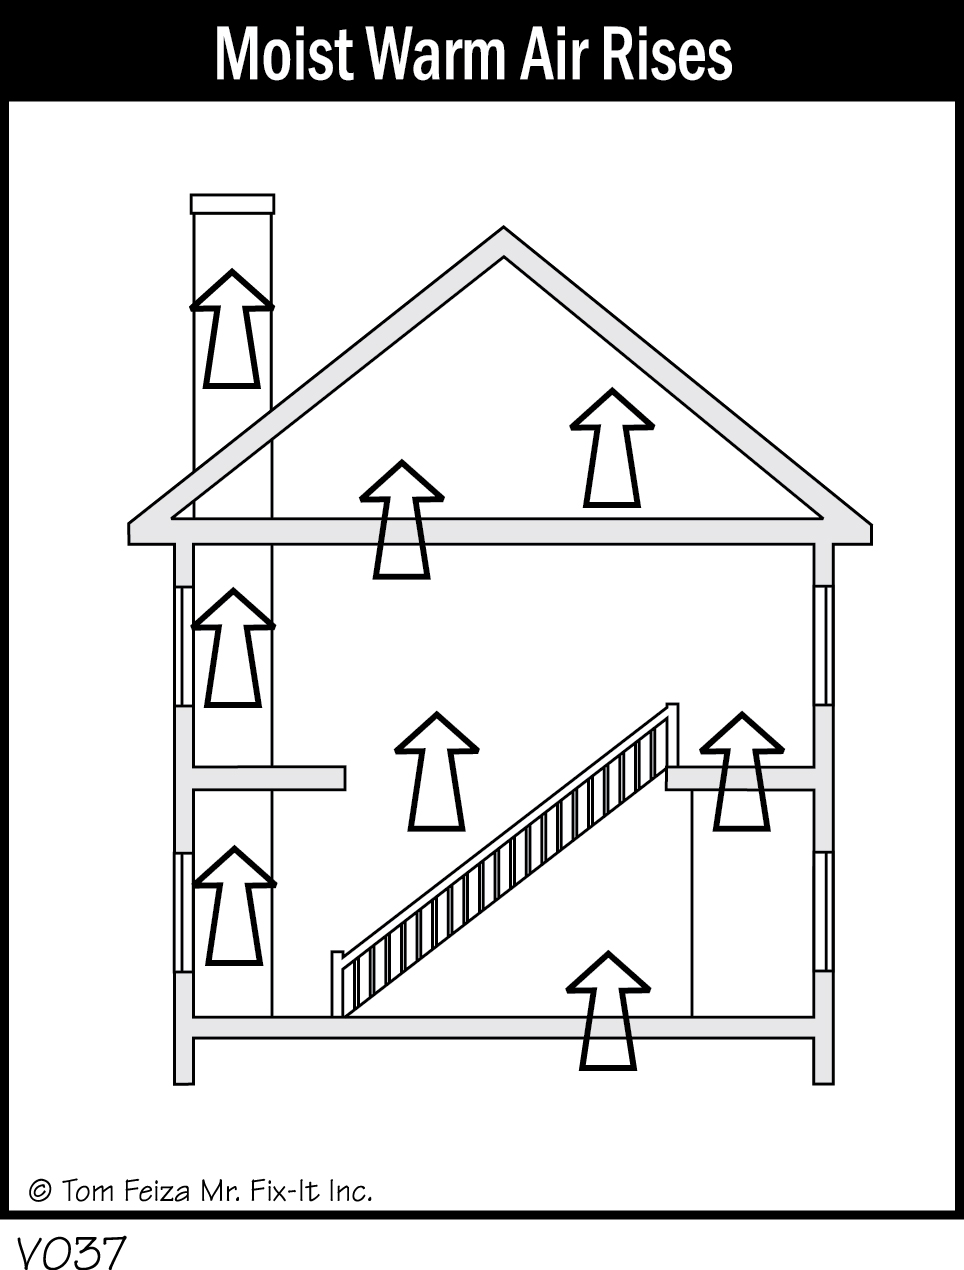
Convection moves heat because warm air rises and cool air falls. Inside a wall cavity, cool air drops on the surface facing the exterior, and warm air rises on the warmer inner surface. This convective loop moves heat from the inside to the outside of the wall.
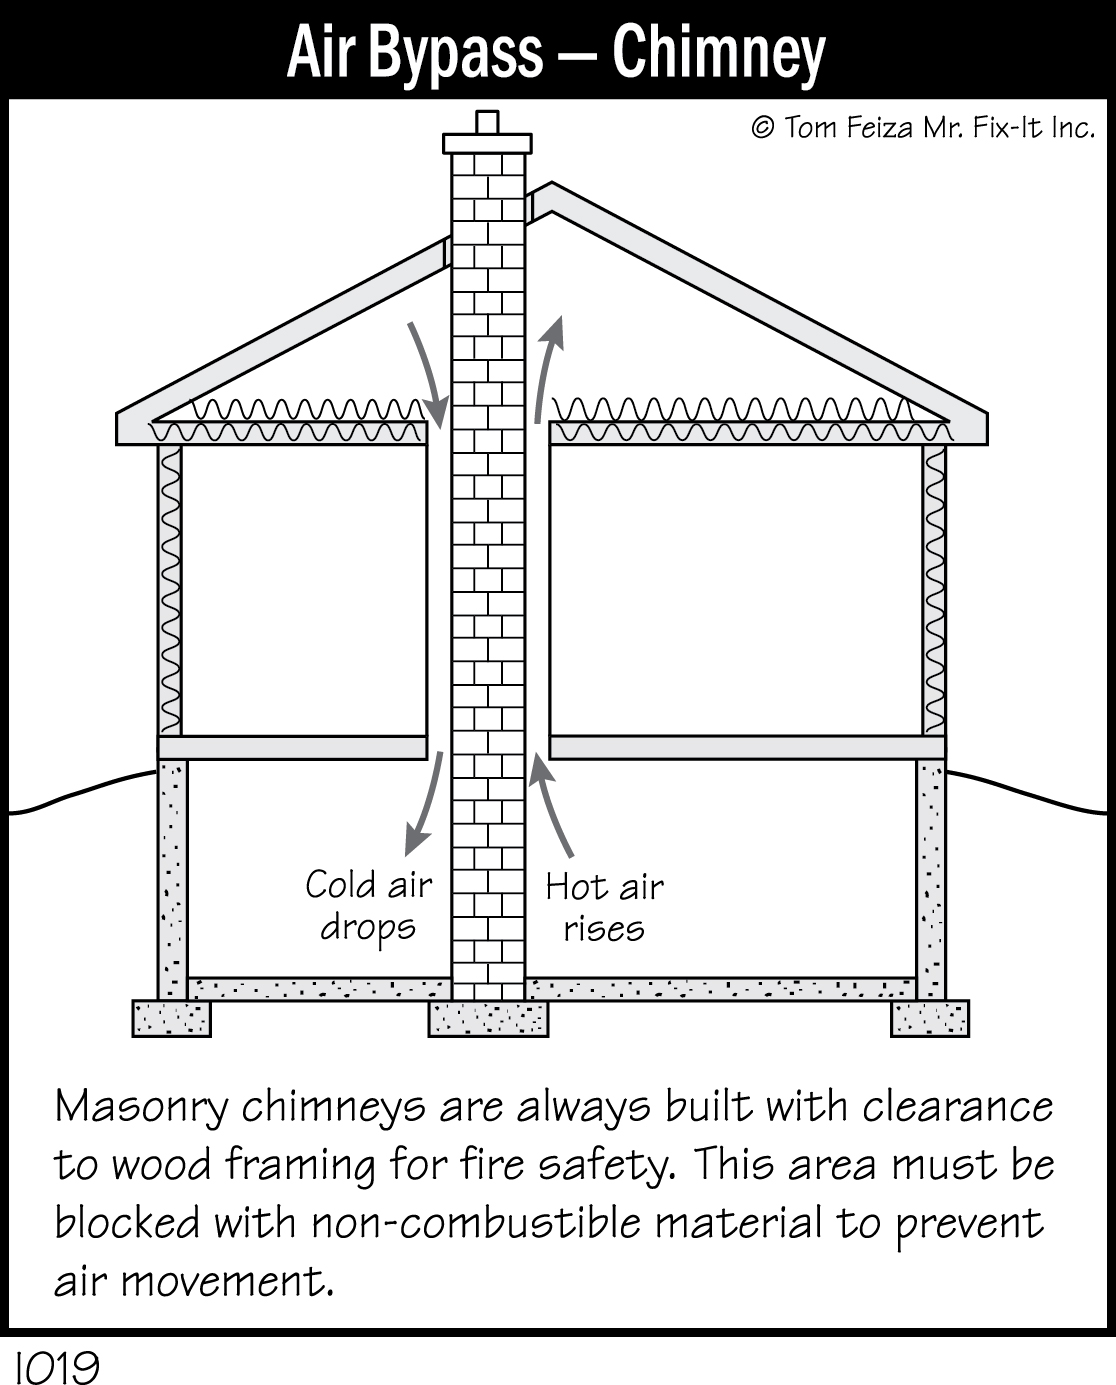
A substantial amount of the heat in warm air pushes to the outdoors through gaps, cracks and other openings as this warm air rises. We also lose a substantial amount of heat just by moving air through our homes with fans or unbalanced heating systems. Even a masonry wood-burning fireplace sucks a huge amount of air up a chimney and can cool your home.
Remember the glove? It keeps your hand warm because it stops air movement and prevents skin contact with cold surfaces. Now tear a hole in the side of one finger of the glove—wind can blow in and chill your warm hand. One air leak ruins the glove’s ability to keep your hand warm.
Stopping Heat Flow—Thermal Boundary
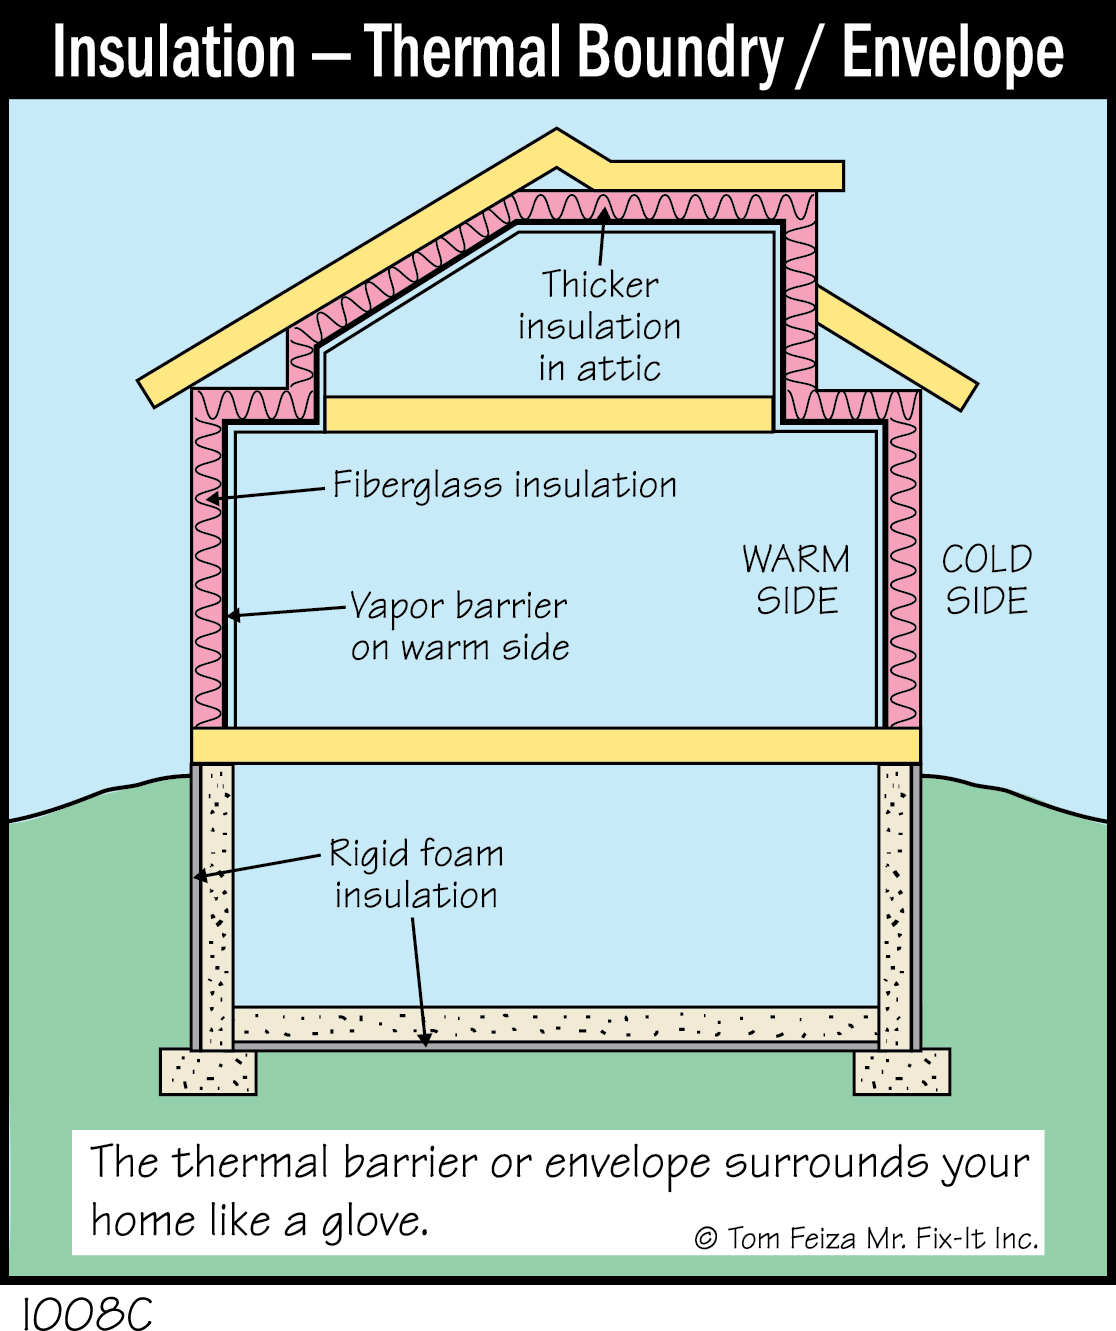
To stop heat flow to the outdoors, we must stop conduction, radiation and convection. In other words, we need to stop heat flow through materials; we need to limit radiation (not a big source of heat loss in homes); we need to stop convective loops in exterior walls; and we need to stop air leaks. Our biggest efforts to stop heat loss should be addressing air leaks and systems that cause air to be sucked out of a home. We need to cover our homes with a warm glove or thermal boundary.
How Does Insulation Work?
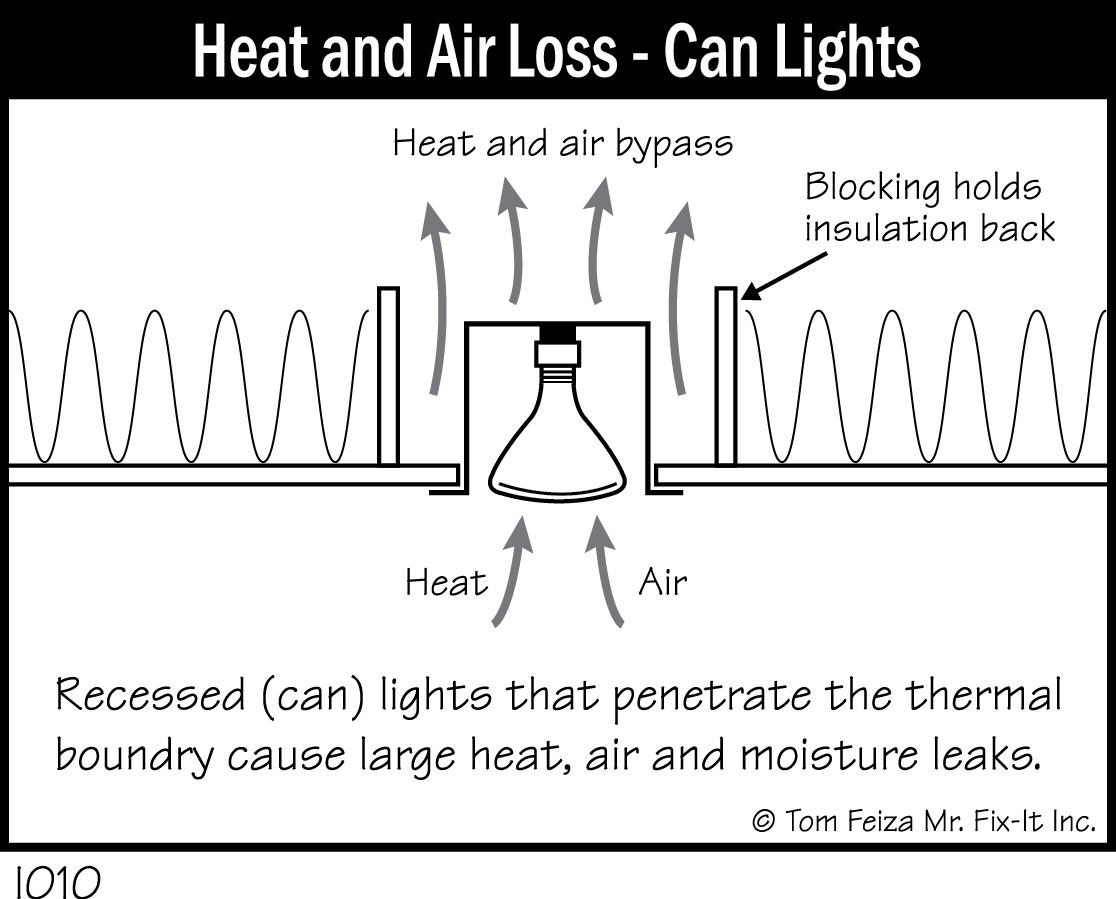
Insulation stops the convective flow of air and consequently halts the flow of heat. Filling up that wall cavity with fiberglass insulation limits air movement and stops the convective loop. Insulation in an attic space above the ceiling stops air movement and halts heat movement into the cold attic, but fiberglass insulation is a poor barrier when air is moving under even slight pressure—such as through the gaps around a light fixture.
Air Boundary—Insulation
Insulation is effective at stopping convective air movement and heat loss but is lousy at stopping air pushed under pressure. In fact, fiberglass is often used as a filter on heating and cooling systems. Air is easily pushed through the thin, fluffy fiberglass filter on a forced air furnace, and in the process the filter traps dirt from the air.
Your home needs a continuous air boundary to stop air flow from inside and at any penetrations. There are plenty of holes in the thermal barrier—windows, doors, outlets, light fixtures, plumbing, and the chimney—literally hundreds of holes through the thermal boundary. Filling these holes and gaps with fiberglass does not stop air movement. They must be sealed, caulked or foamed, or blocked by metal, wood or drywall.
In modern homes, a vapor barrier or vapor retarder on the warm side of the insulation also defines the thermal boundary. Normally, in new construction, this is a sheet of plastic placed under the drywall and inside the insulation. (In a heating climate, it is placed on the warm side of the insulation.) The vapor retarder stops the flow of warm, moist air from your home to the cold outside. This saves a bunch of heat, prevents the movement of moisture, and limits potential condensation inside walls.
In older homes, air movement was stopped by plaster, trim and paints. But older homes were quite leaky; a lot of air flowed to the outside, and we lost a lot of heat and moisture. Remember the classic drafty, dry old home—air leaks kept it dry. Years ago we did not care much because energy was dirt cheap, and we just wasted heat, allowing it to flow to the outdoors to keep the wall warm and dry.
Insulation—R-Value
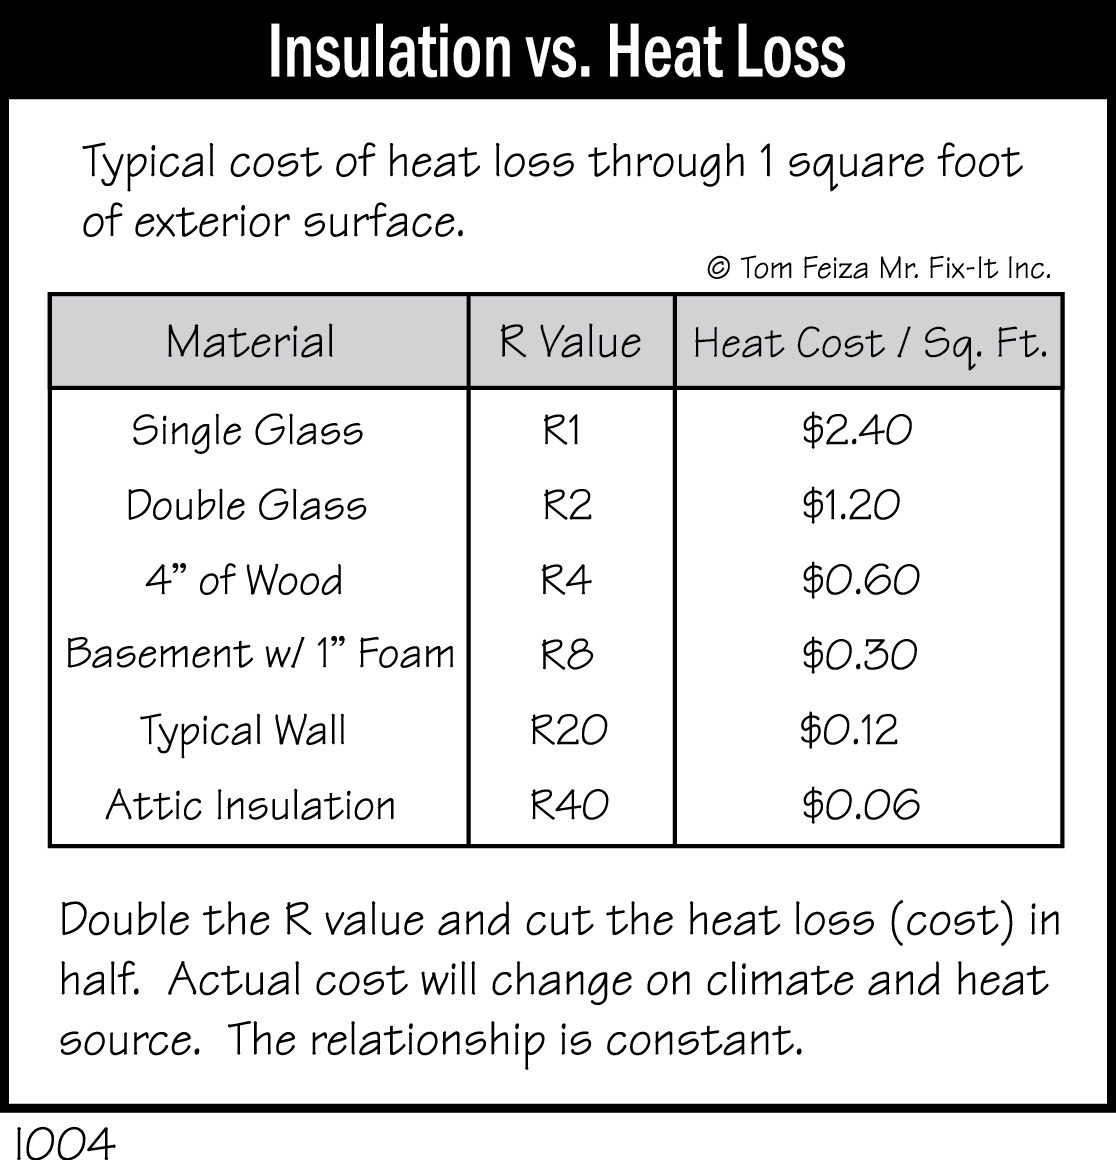
Insulation is rated by R-value or resistance to heat flow. The higher the R-value, the greater the resistance to heat flow. Most fluffy fiberglass, mineral wool or cellulose insulation materials have an R-value of about R-3 per inch of thickness, so a 6-inch batt of fiberglass insulation has an R-value of about 18 or 19, a 12-inch batt has an R-value of about 38, and so on.
Yes, they do make high-density fiberglass batts that have a higher R-value. The R-value of cellulose is generally about R-3.7 per inch. Rigid foam insulation also packs a big punch—from R-5 to even R-8 per inch.
The key to insulation is that it stops convective air flow and therefore stops heat flow. Stop the air flow and you stop the heat flow. But you also must address the air that flows under pressure—remember, fiberglass insulation can be a good air filter.
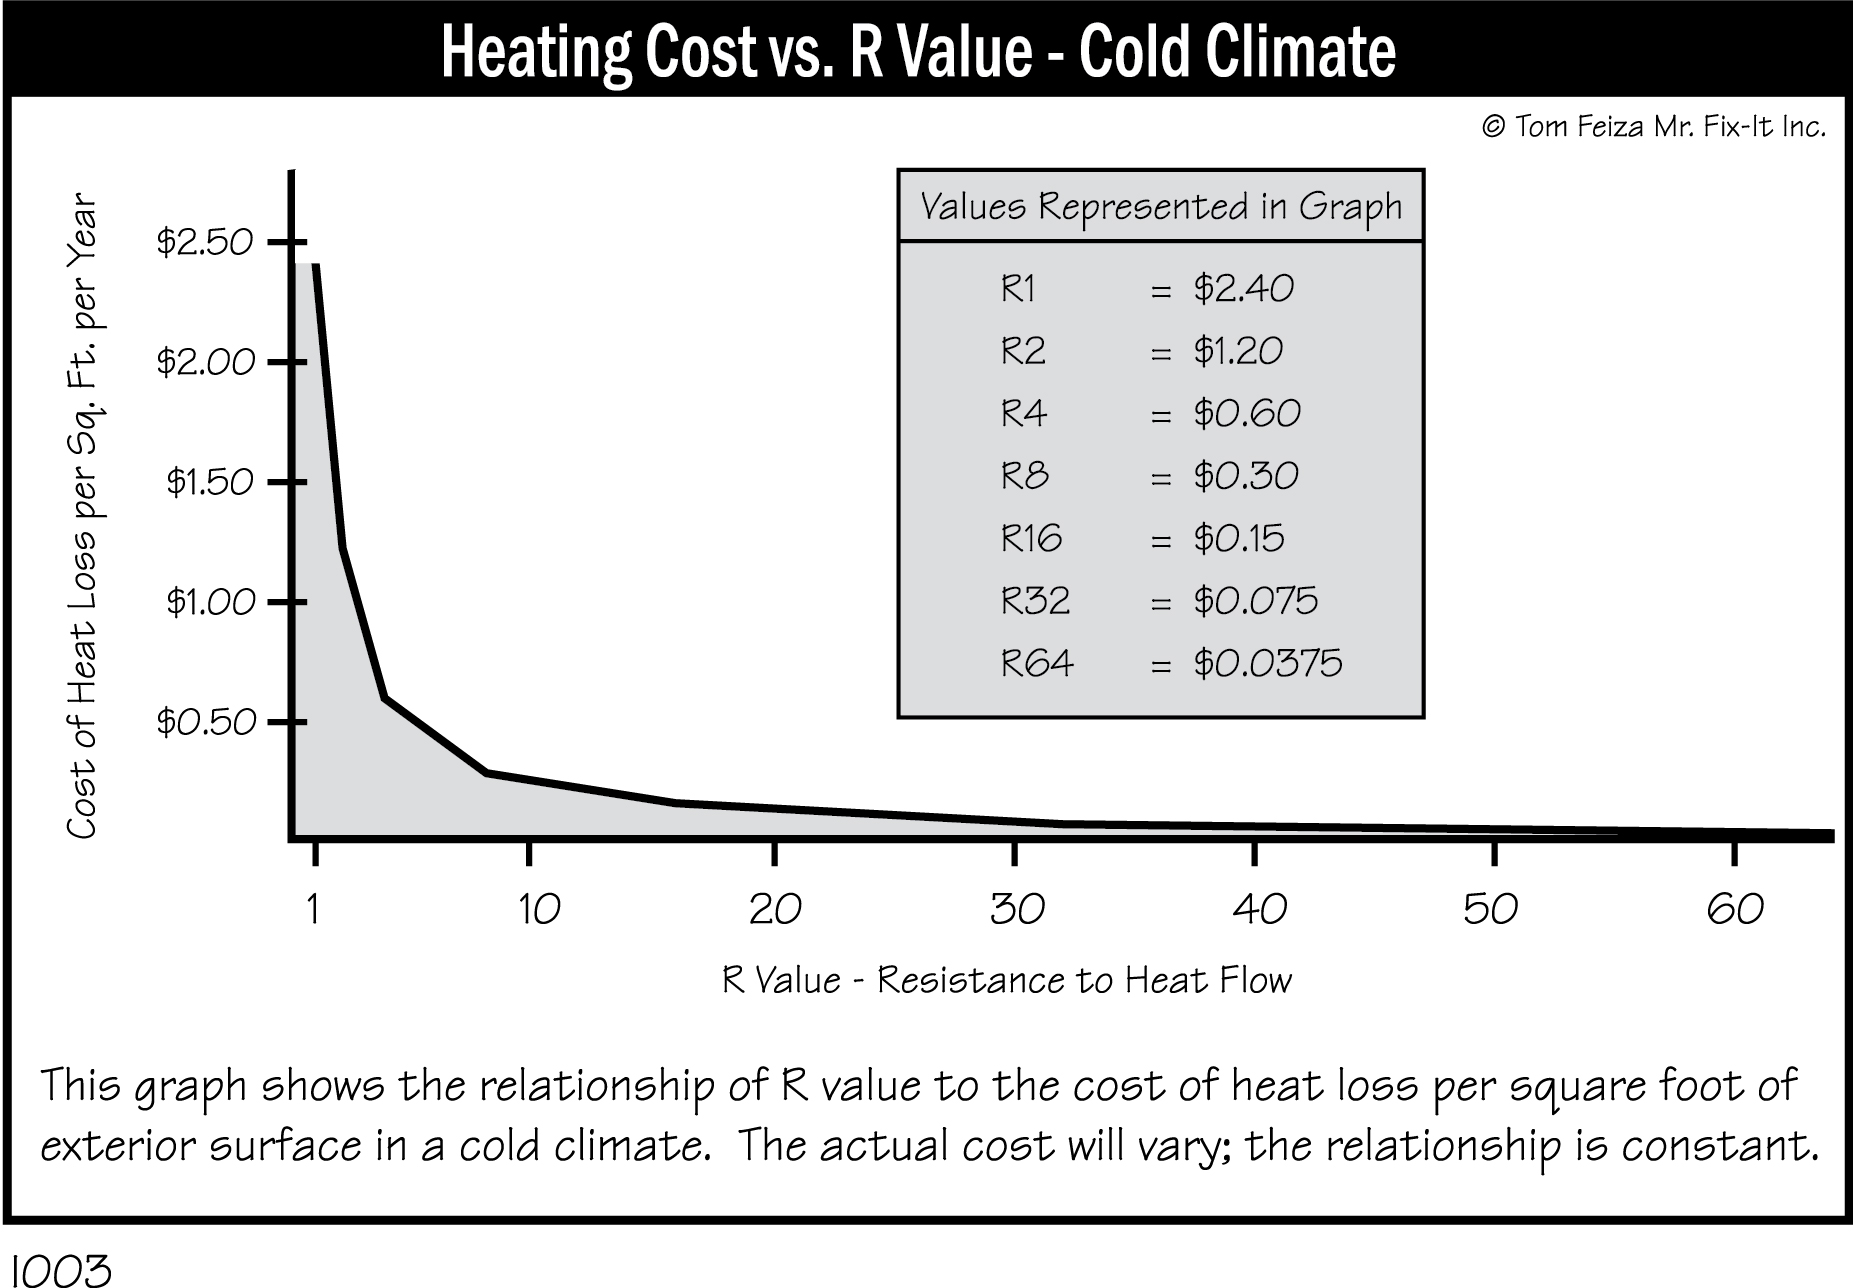
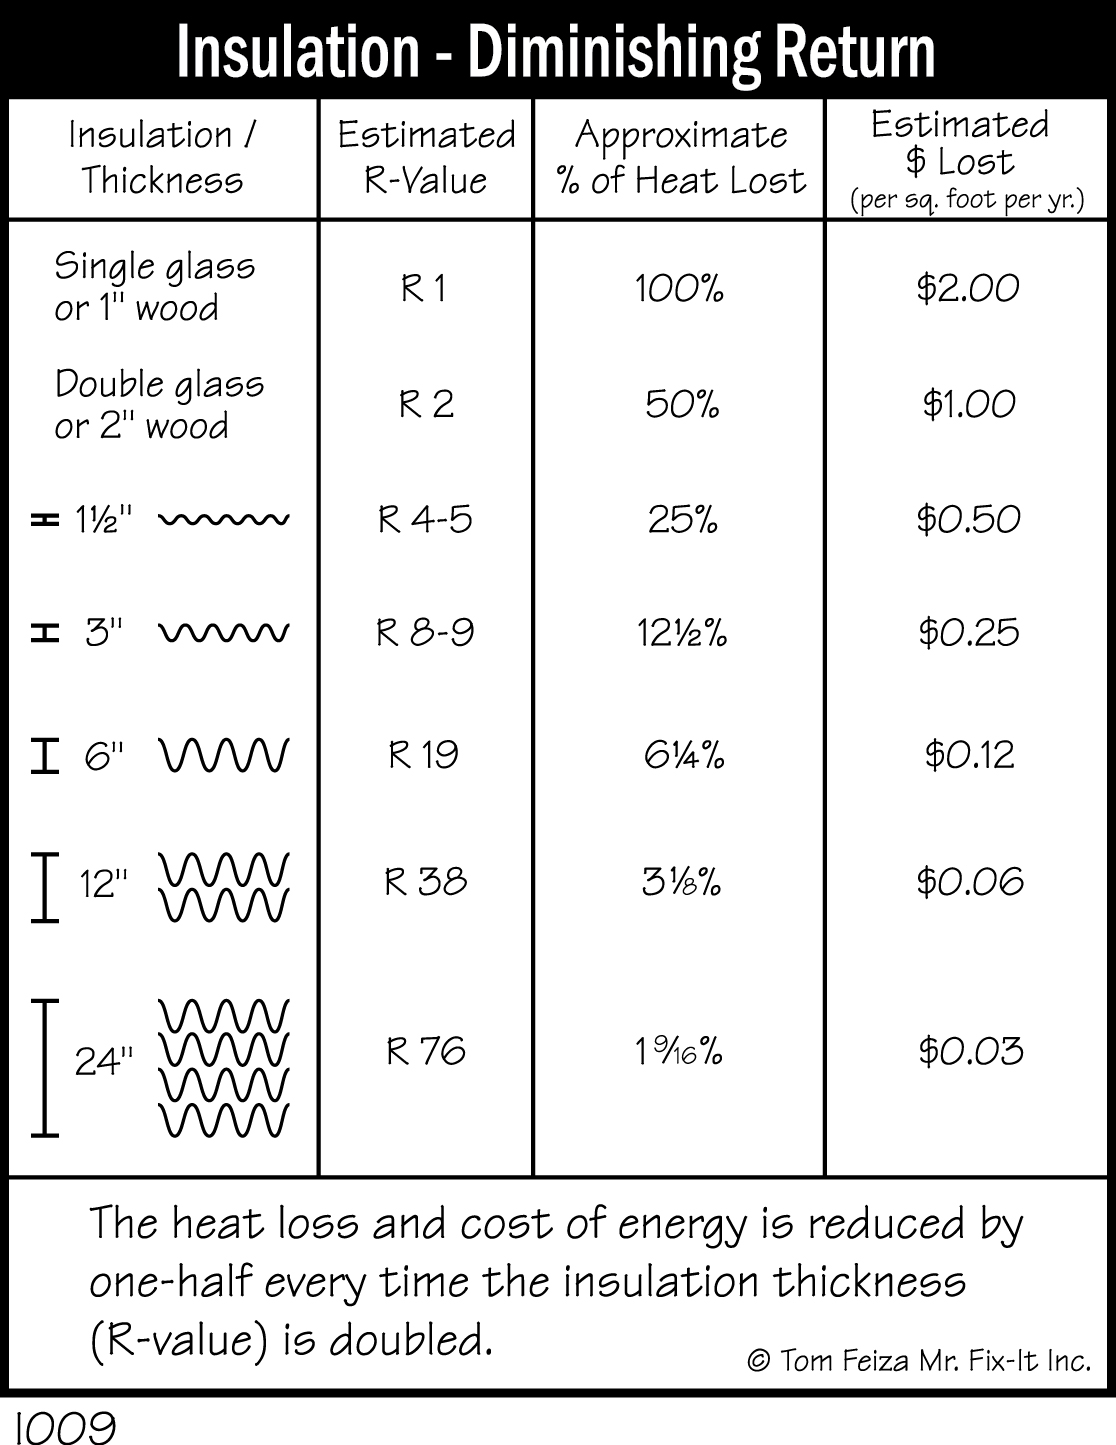
The other key to understanding insulation is that every time you double the thickness of the insulation, you cut heat flow in half. With 3 inches of insulation, you have about R-9 and a big heat loss. Double that to 6 inches and you are at R-19, cutting your heat loss in half. Double it again to 12 inches and your R-value is about 38, and your heat loss is cut in half again. Once you get to R-38, you quickly approach the area of diminishing returns; you would have to double the R-value again to 76 to cut the heat loss in half—and at this point there is very little heat loss.
The government, smart engineers and insulation manufacturers have pushed the numbers around for years to determine proper insulation levels for walls, attics and basements to achieve economic payback. The actual recommended value depends on the climate, the type of energy source, and the cost of energy. For example, most northern climates require an attic insulation value of R-38 or higher.
Air Flow Under Pressure
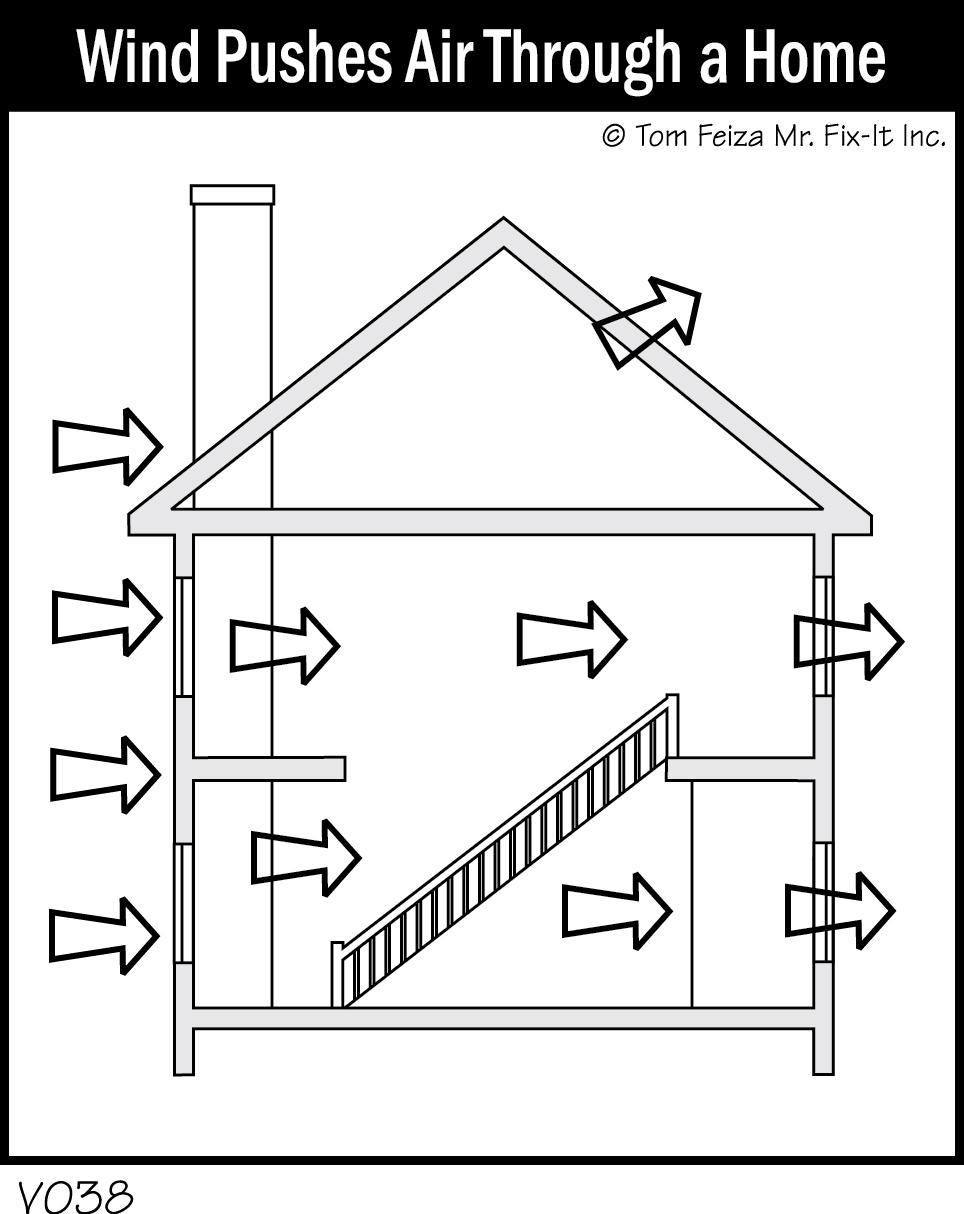
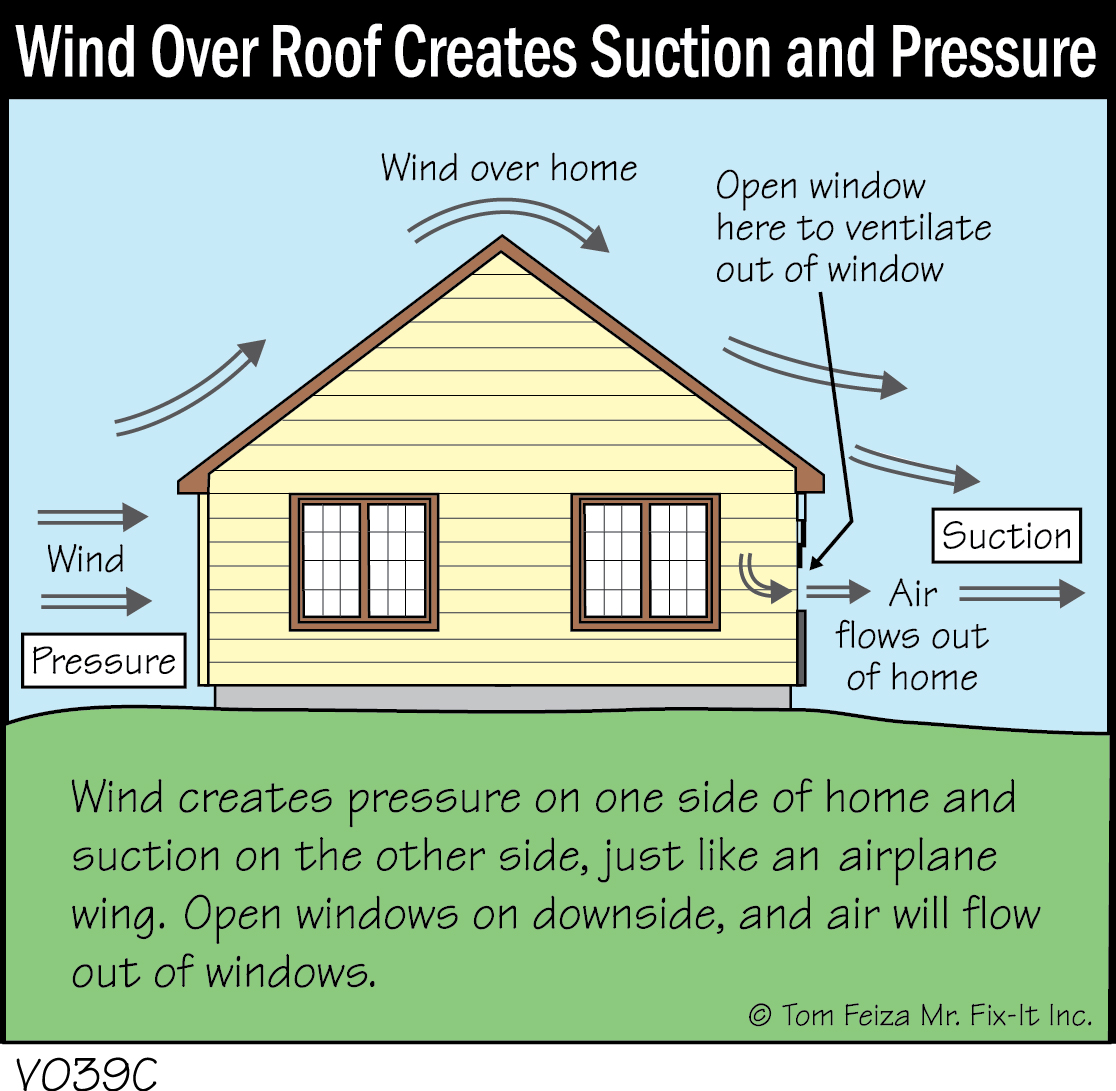
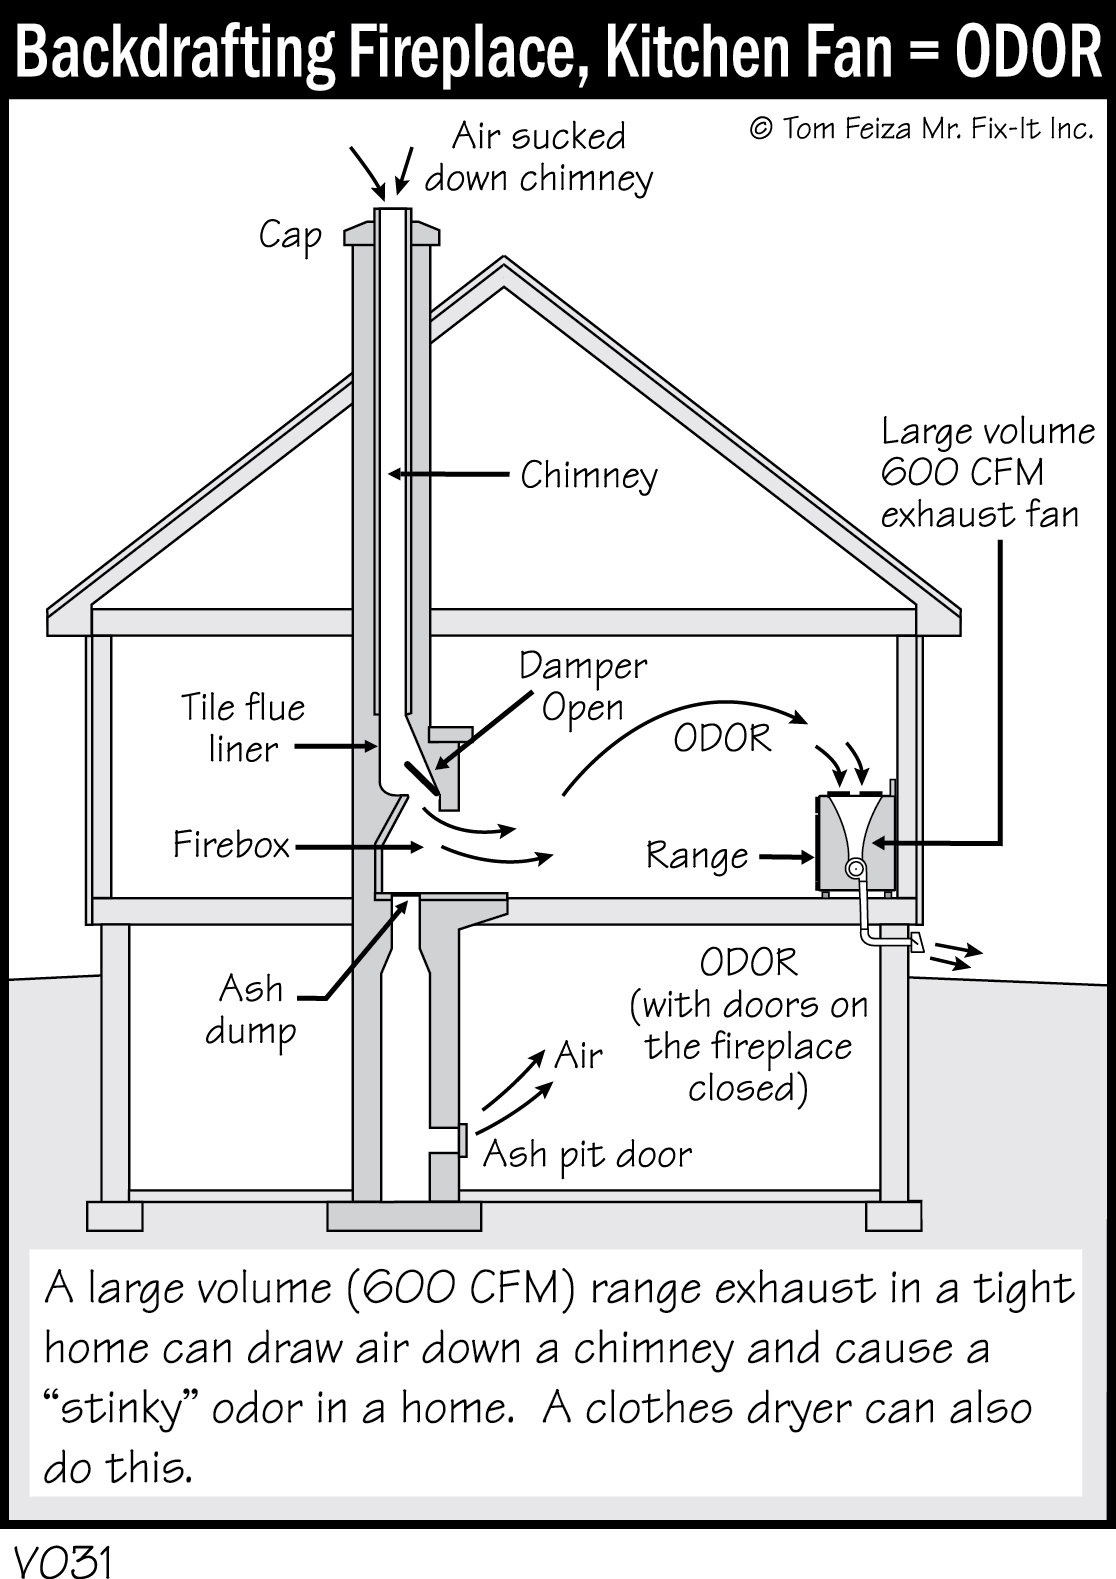
Because our homes consist of complex systems of many interrelated components, numerous interactions push or pull air through our homes. Some are easy to understand—wind blowing against a home pushes its way in. A roaring fire in the fireplace sucks air and heat up the chimney and draws that air through leaks in the thermal boundary. A kitchen or bath exhaust fan pushes air to the outside and sucks air through the opening in the thermal barrier.
Some air movement is more subtle—for instance, warm air rises, creating a stack affect: pushing air through any penetrations into the attic. That same stack effect can draw air up a chimney when the fireplace damper is open while fire is burning. The chimney attached to any gas-burning appliance constantly draws air up and out of the home.
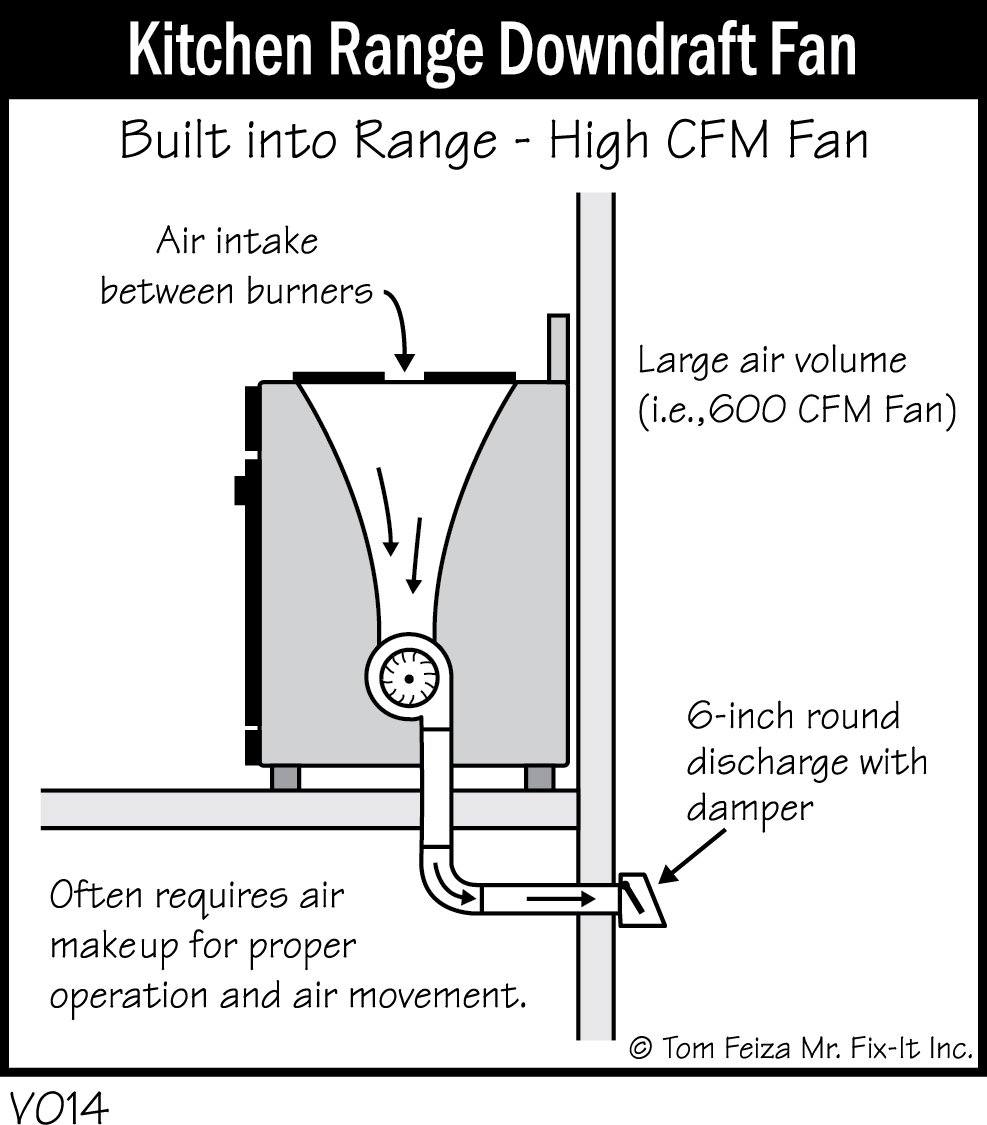
We complicate this problem with heating and cooling equipment that may not be balanced; the upstairs may be pressurized while the basement is under negative pressure—sucking air from the outside. We may install a huge capacity kitchen exhaust fan that sucks great quantities of air out of our homes. Our bath fans blow air to the outside.
Now Approach Your Home As A System
You want to stop those pesky air leaks, and you want to invest your sealing and insulation dollars where you will have the biggest improvements in comfort and payback. You also should consider how to reach problem areas. The inside of the wall cavity is hard to insulate; you must cut holes in or remove drywall or siding to put insulation in the walls.
Start With Simple Insulation Projects: The Attic
Check the attic first. The insulation level must match your climate. You must close any air bypass or leak into the attic. You may also need to increase the ventilation above the insulation to limit trapped moisture in a space that is no longer heated by heat loss from your home.

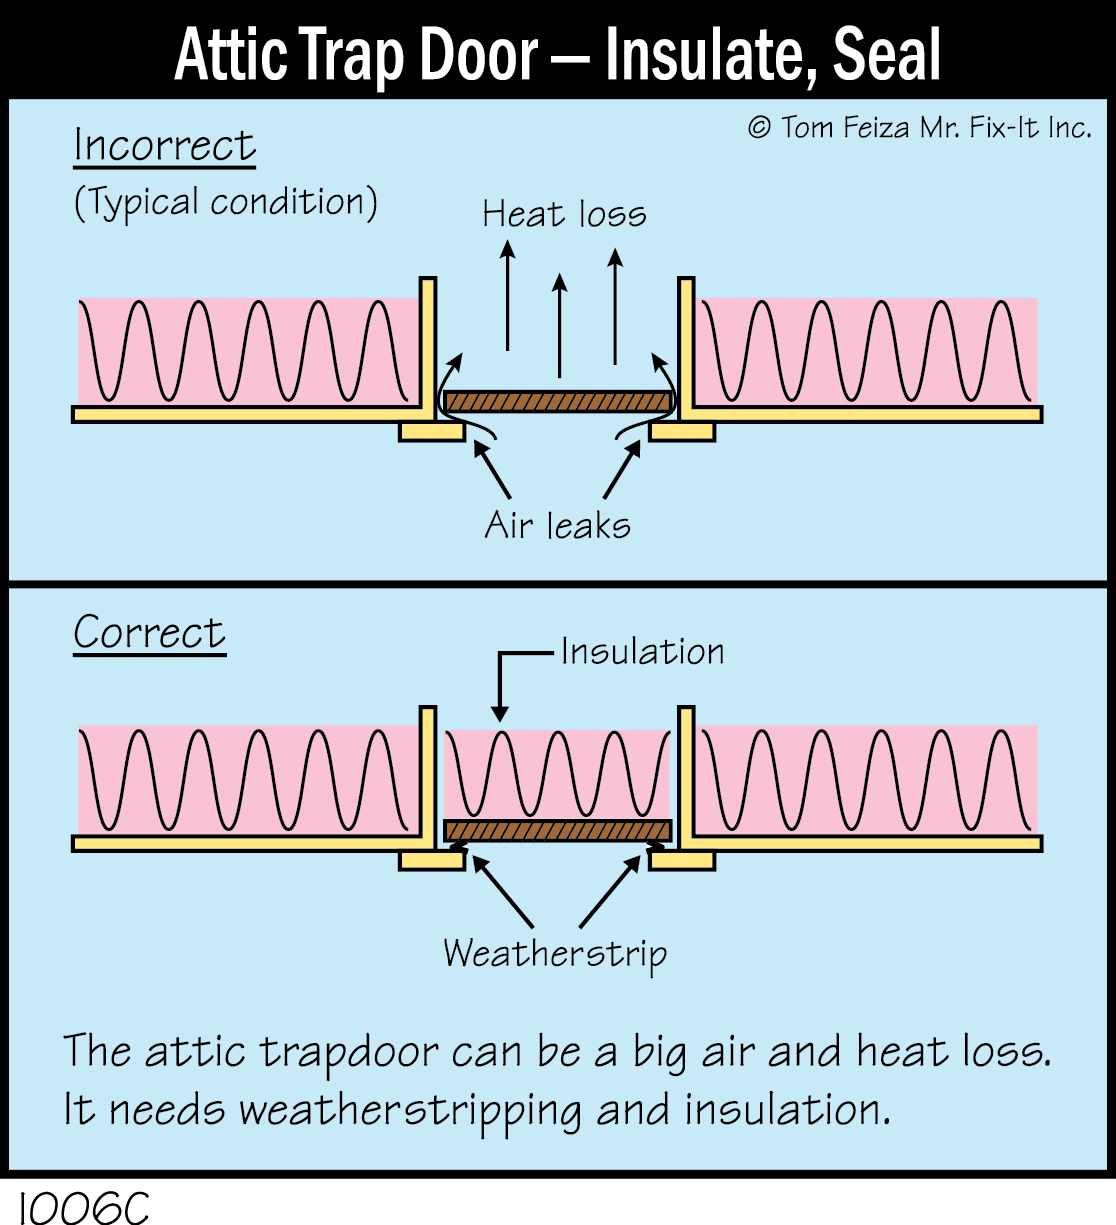
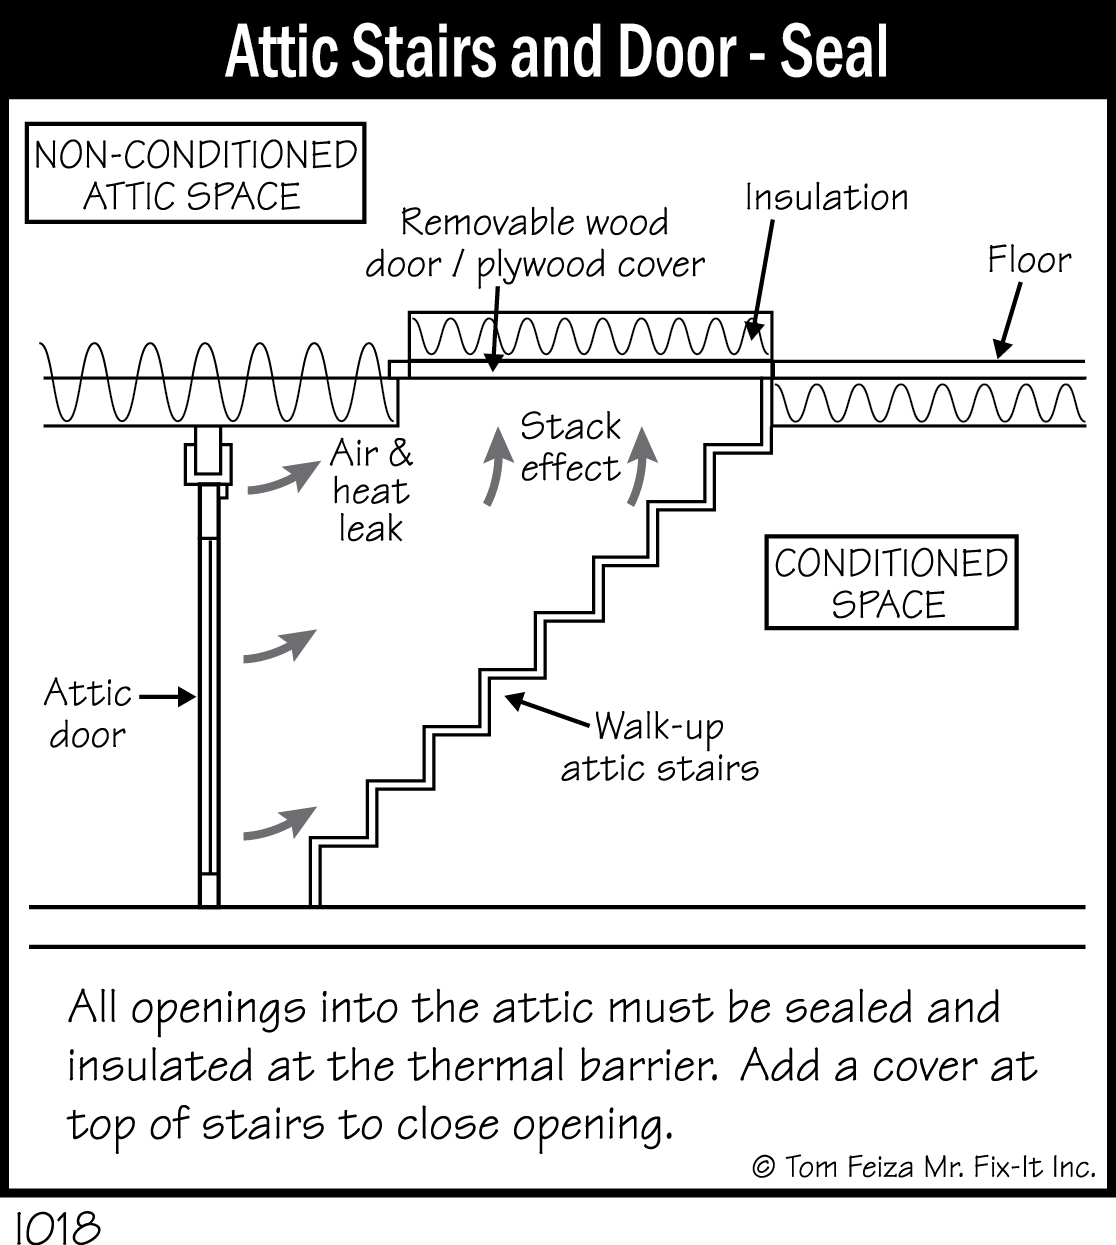
Survey the attic for potential air leaks through the thermal boundary to your home. Common culprits include the area around chimneys, plumbing vents and wire penetrations. The trap door or stairway into the attic can be a major air channel. “Can” lights that penetrate the insulation also create a big problem. You may need to have a professional help address these leakers.
Want to find an air bypass into the attic? Lift the fiber insulation around the hatch door or near plumbing or electrical wiring. If you see darkened insulation, you have just found an air leak into the attic. The fiber insulation is black because it is filtering out dirt as air passes into the attic.
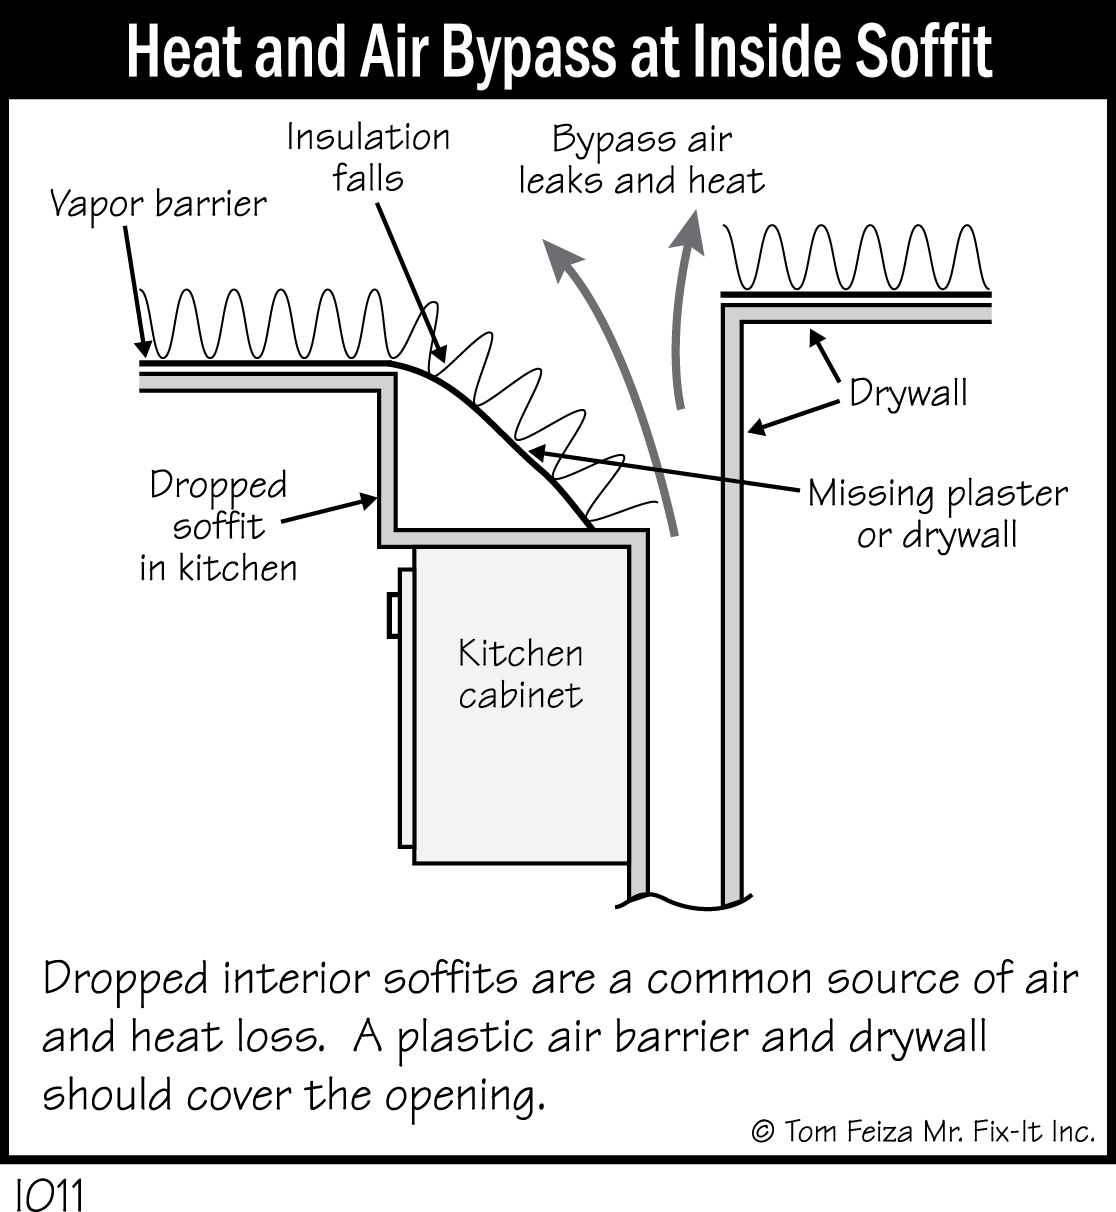
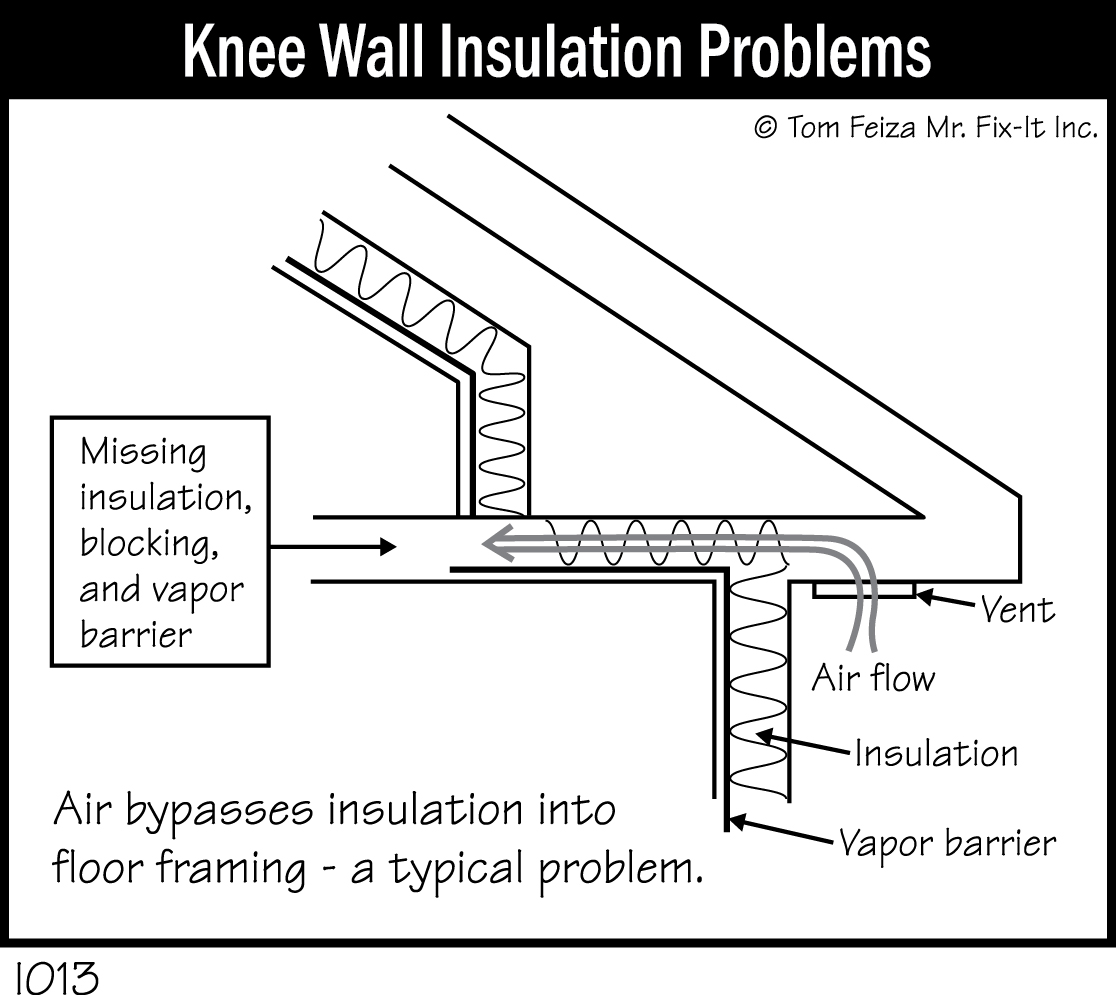
Air leaks and heat loss can occur in another area you may not think of: over dropped soffits, such as the area above kitchen cabinets. Often, these areas are not insulated or sealed. Areas above stairways and around chimneys or major plumbing or other penetrations are also big offenders. The typical Cape Cod home with 1½ stories is difficult to insulate properly because of the need to work around walls, floors and ceilings loaded with potential for air movement.
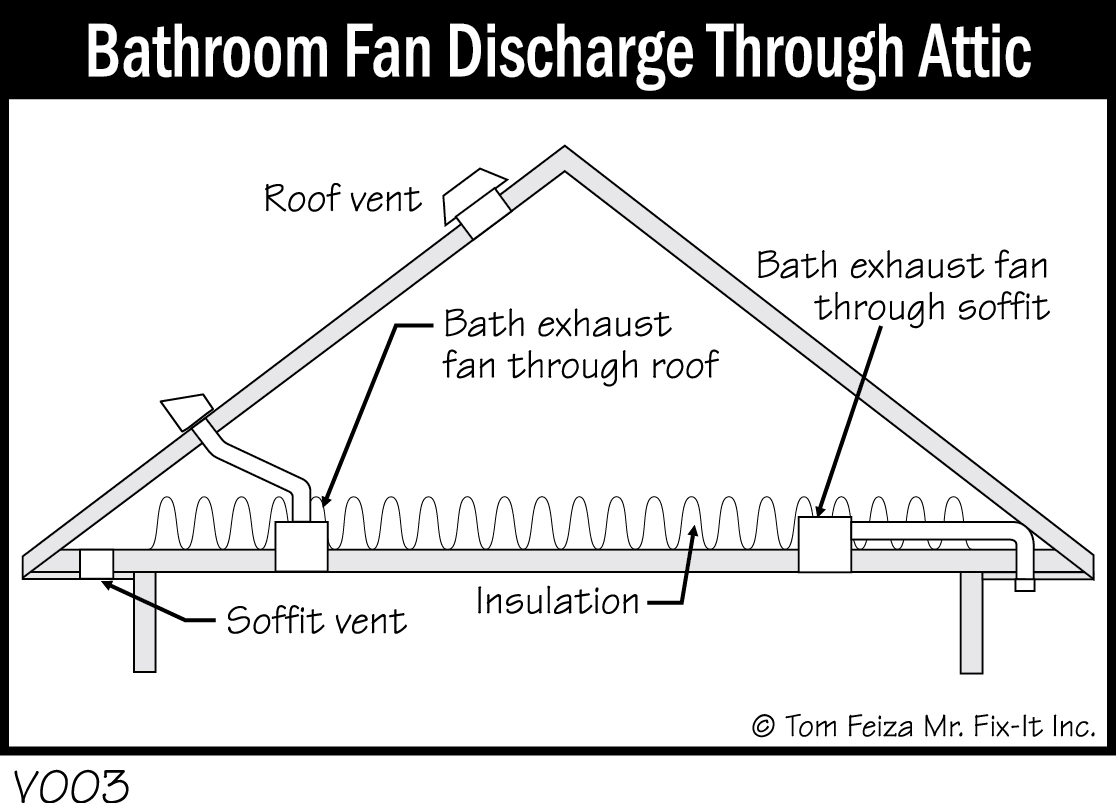
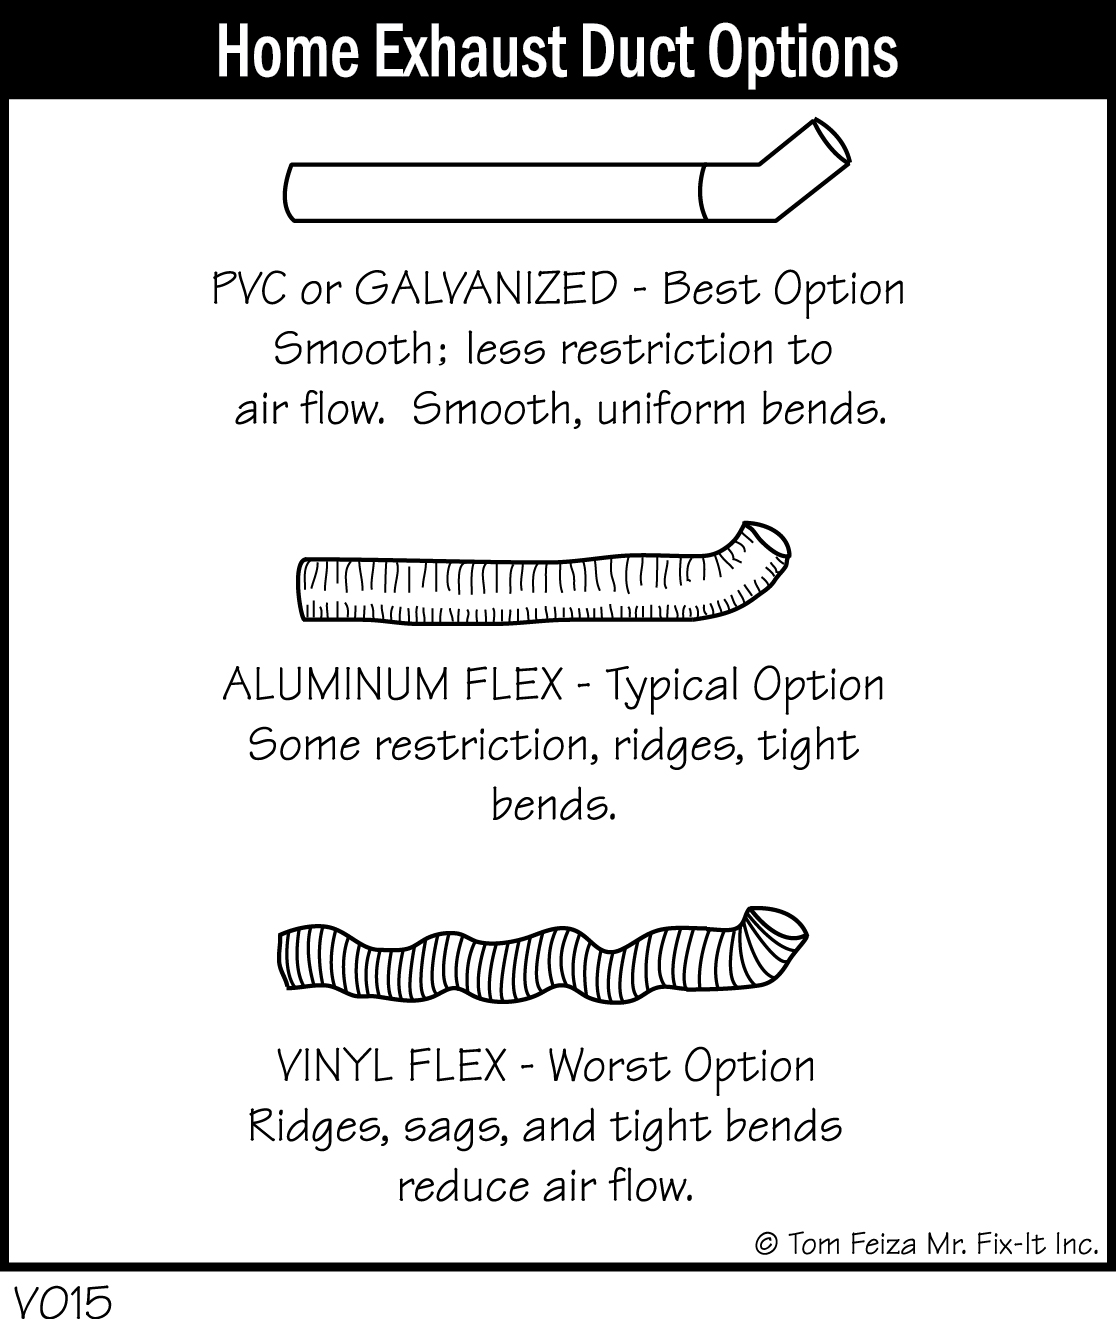
You also must route all kitchen and bath exhaust fans to the outside—not into the attic. In the 1950s and ’60s it was common to dump the exhaust fans into the attic. We probably got away with it because the insulation also was poor and, in effect, we heated the attic with heat from our homes. Because the attic was warm, condensation and moisture did not create a problem.
In many climates, the attic should have a minimum R-38 insulation level, but check with government resources and local contractors to determine the correct level in your area. Remember to insulate and seal any trap doors and stairways into the attic—they are the big losers.
Insulate Over Old Insulation
Sure, you can add insulation over the top of existing insulation. You just don’t want any air gaps, and the insulation should fit tightly to the existing insulation. If the space between ceiling joists is filled with insulation, you can add batts parallel or perpendicular to the framing.
If existing insulation is below the framing, you should fill in the voids, and blowing insulation over the top may be the best bet.
Attic—Maintain Or Add Ventilation
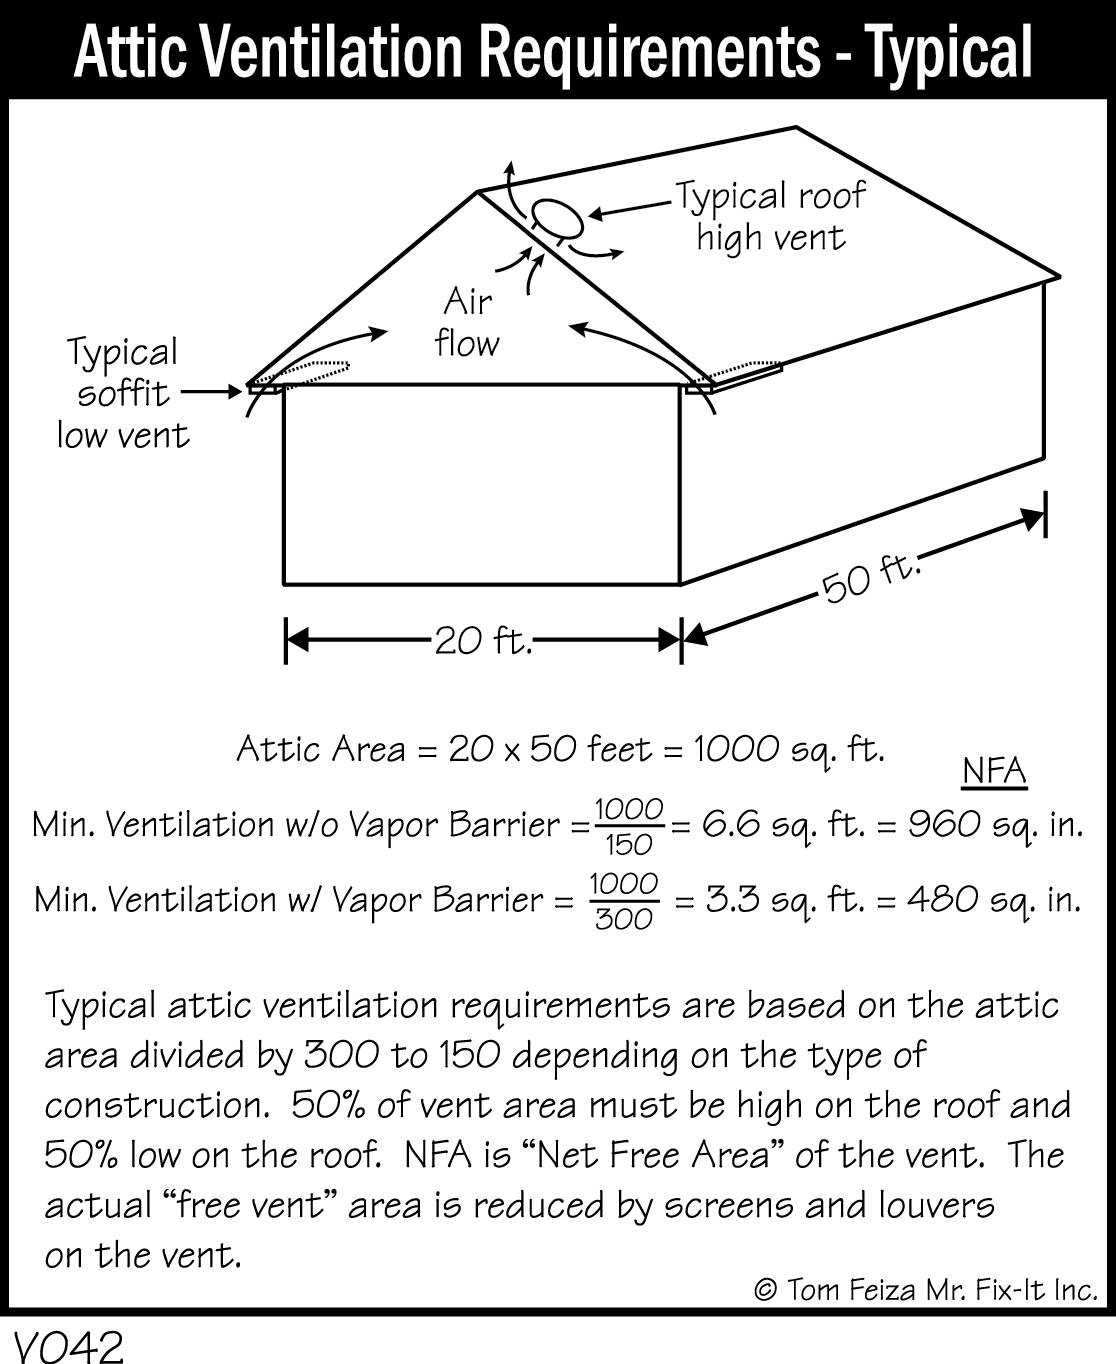
Part of adding insulation to the attic is maintaining adequate attic ventilation or improving ventilation above the insulation. In most cases, there should be 1 square foot of free-vent space for every 300 square feet of attic space. For homes without a vapor barrier—we assume they leak more—the value is 1 per 150 square feet. The ventilation should be divided between the overhangs and near the ridge of the roof.
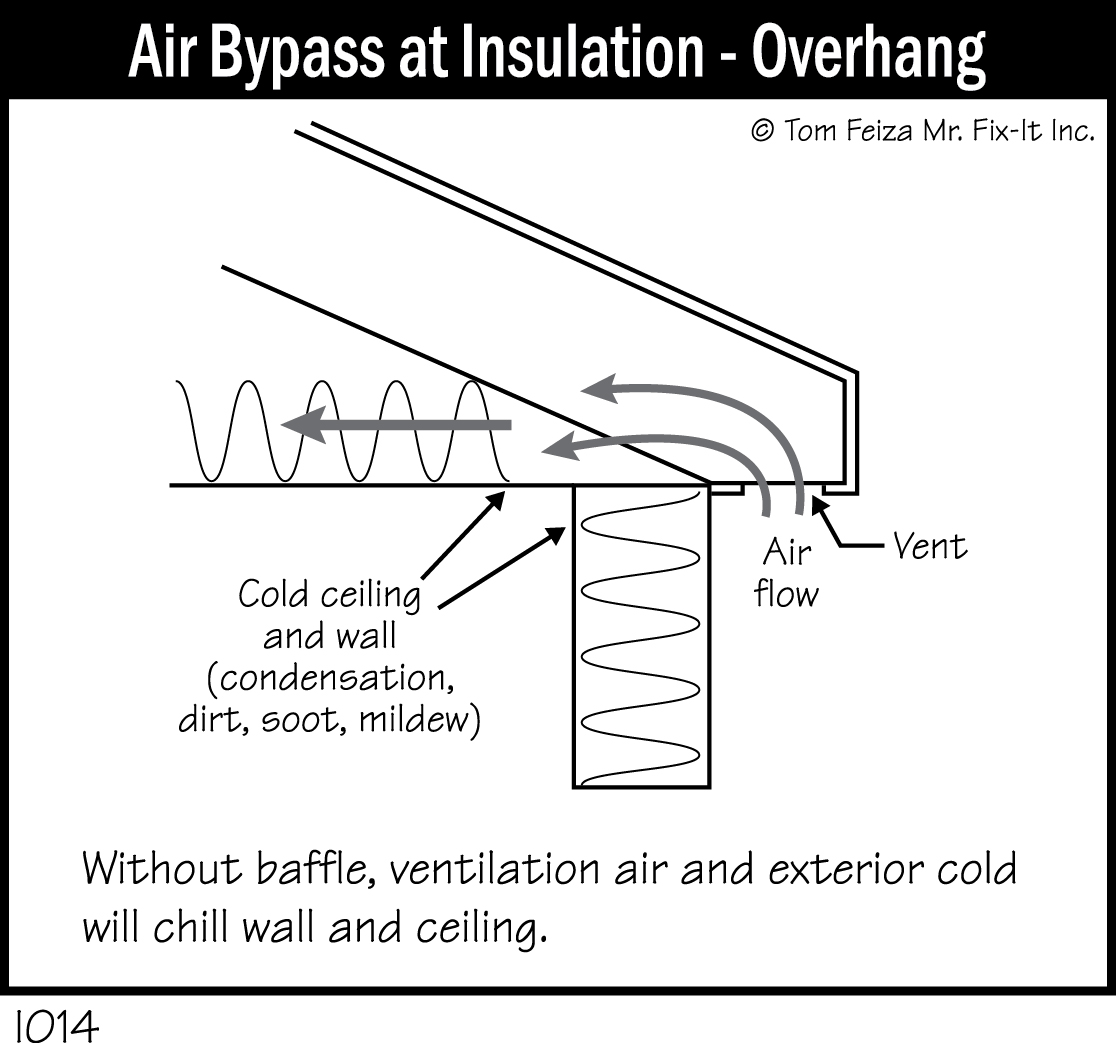
When insulation is added, it is very important to keep the areas above soffit vents clear for air movement. If you block these areas with insulation, you can create moisture problems. In older homes, these areas should be checked, because often they are blocked with insulation.
Chutes direct air over the insulation and into the space above the insulation. Often, chutes must be added as the insulation thickness is increased. Blocking the areas at the outer edge of the insulation is great, since it prevents air from entering the edge of the insulation.
Cathedral Ceilings
Older cathedral ceilings in which the ceiling follows the angle of the roof are very difficult to insulate and ventilate properly. Unless your home has a moisture or condensation problem that requires correction, you should probably look for other areas of your home to insulate.
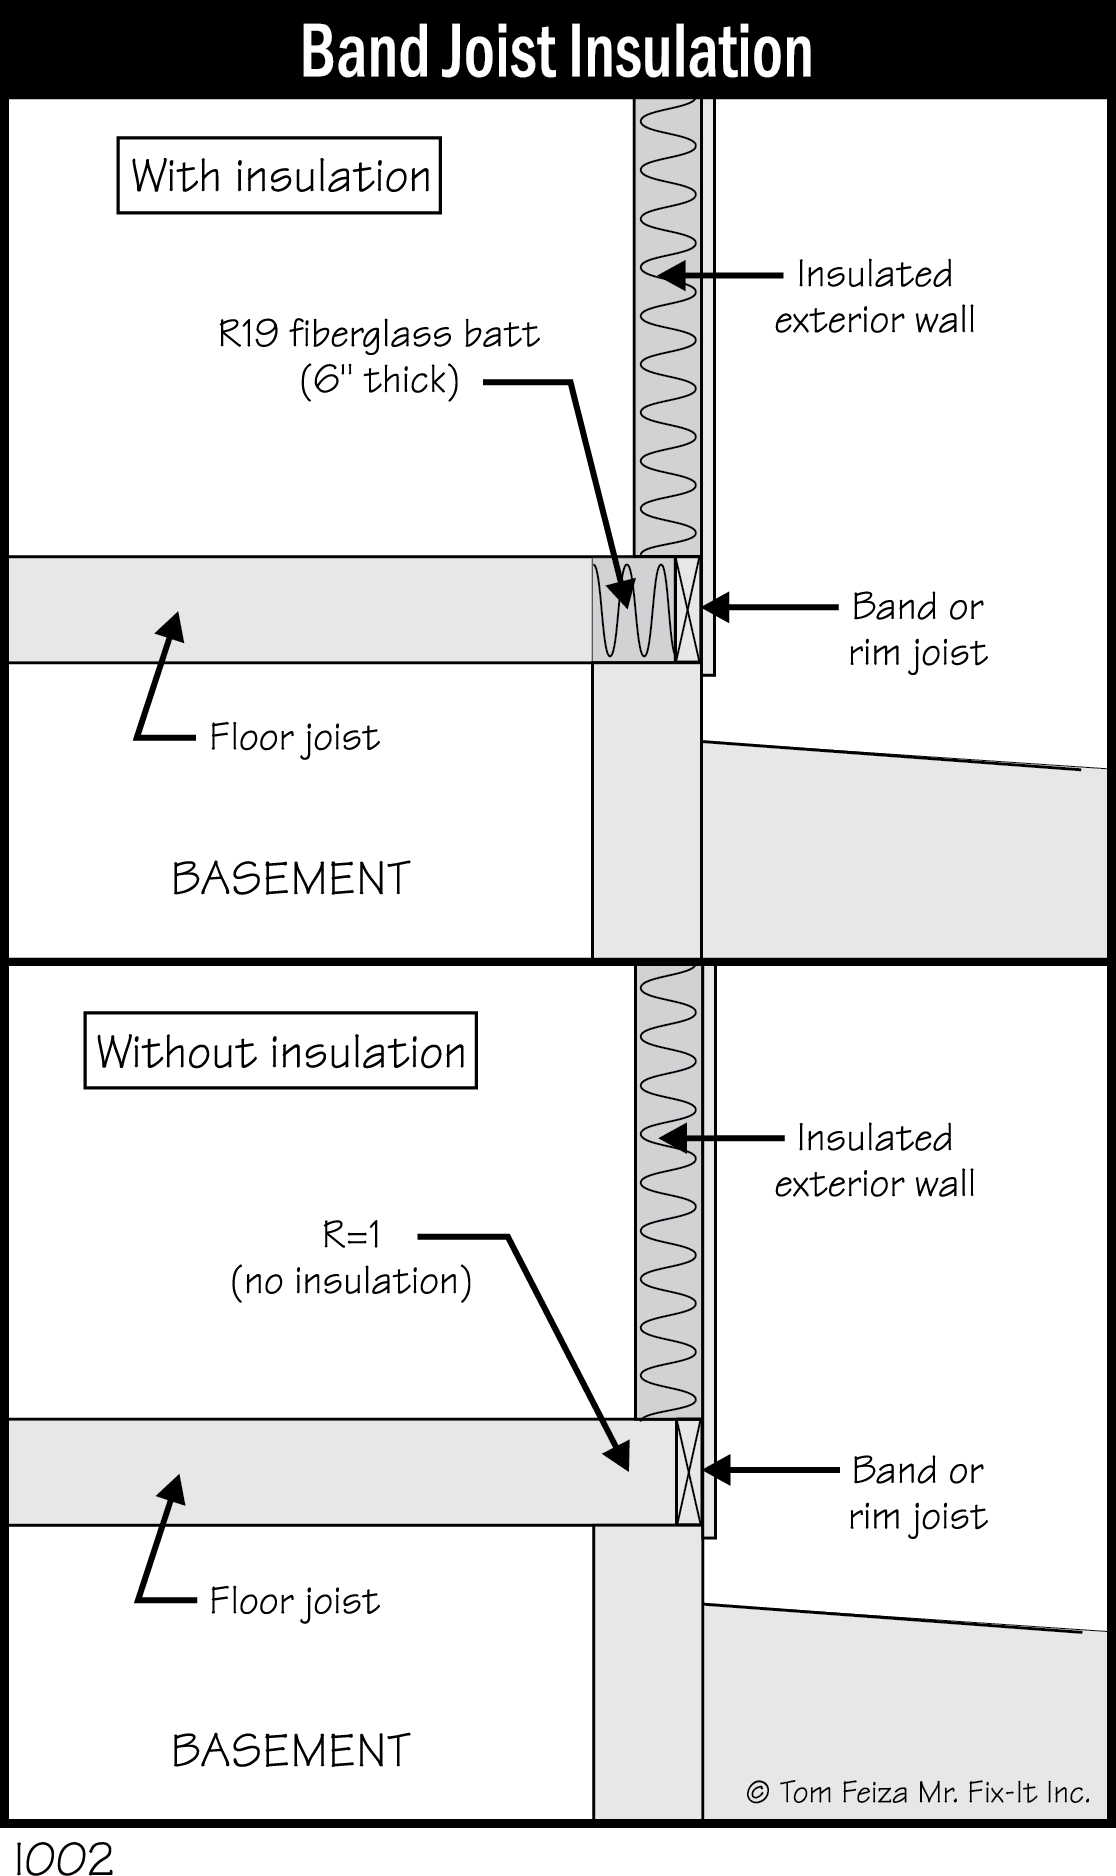
Insulate The Band Joist
Just as important as the attic is insulating the area above the foundation walls and between the framing. Think about it: there is no wood-framed exterior wall with insulation in this area. The only protection from heat loss is the siding band joist, which is 1½ inches of wood, about R-2.
In moderate climates, this area often is insulated with tight-fitting 6-inch-thick fiberglass batts cut to fit the space. In very cold climates, this area would benefit from additional insulation and blocking with drywall or a fireproof material and a vapor barrier from the inside. The barriers stops air movement into the space and reduce condensation on the cold framing.
Before the area is insulated, it should be sealed tightly. You can caulk or foam-fill any gaps. If you look at this area from indoors on a sunny day with the basement lights turned off, you will see every gap and crack.
Insulate Exposed Basement Or Crawl Space Walls
Any basement or crawl space wall exposed to exterior air suffers significant heat loss.
The portion of the wall below the exterior soil loses less heat because it is not exposed to air movement and the soil may be warmer than the air temperature, but there is still some air loss.
Insulating this area is a tough project. Ideally you would excavate the exterior soil and add a moisture-resistant rigid foam board to the exterior of the foundation wall. As an alternative, insulation can be fitted to the interior of the wall, using either foam boards covered by drywall for fire protection or a special wide, vinyl-covered fiberglass blanket.
In crawl spaces, you may also want to consider insulating the floor between the living space and the crawl space. This would make sense if the crawl space is ventilated to the outside and is not heated or cooled.

Finally, Consider Exterior Walls
I say “finally” because it is very difficult to add insulation to exterior walls. In an existing home you can blow insulation into each wall cavity between the stud framing, but you must drill a large hole at the top and bottom of each space to blow in the insulation. This involves drilling (and later, patching) plaster or drywall, or drilling the exterior finish.
Often, insulating exterior walls should be combined with major remodeling when siding or interior walls are replaced or repaired. It may not be cost-effective to insulate exterior walls in some situations, and most homes built after 1930 do have some type of insulation that helps with thermal efficiency—so you are not starting at R-0.
The exception is a very old (1920 or earlier) home in which balloon framing was used. This means exterior wall studs extend from the attic to the foundation walls. In this case, you can reach some of the wall cavity space from the attic.
The Blower Door Boys
You could also consider an energy evaluation of your home. This will cost several hundred dollars. The evaluation often is subsidized by local utilities or your state’s energy program. Home evaluators are trained to check all systems and components of the home and provide a prioritized list of energy improvements. Often they will pressurize your home with a blower door and test for air leakage. A good evaluation would include an energy analysis and a prioritized list of improvements which indicates energy-efficiency payback for each improvement.
The Government Is There To Help
Really, it is. You can find good information and resources at the U.S. Department of Energy’s Energy Star site, www.energystar.gov. This site includes step-by-step information about choosing and installing insulation. It details R-value recommendations for various surfaces and climates. The site does an excellent job of portraying details and information.
Another good resource is the Department of Energy’s Energy Efficiency and Renewable Energy site at http://www.eere.energy.gov/consumer. It provides information on home energy audits, contacts, and a multitude of references to energy information.
Use A Pro?
Yes, it is a good idea to have a professional evaluate the condition of your home and perform much of this work. If you are considering blowing in insulation or addressing “can” lights that penetrate the thermal barrier, you definitely need professional help. I’ve tried to keep the information simple in this article so it is easer to understand; a professional will be a big help with details and climate-specific information.
Carbon Monoxide
As you tighten up your home, obviously you decrease its air exchange rate. This can result in problems with gas-fired appliances and the air necessary for proper combustion. As part of the process of tightening up your home, always have your gas appliances serviced by a professional. You should also install a carbon monoxide alarm. These alarms are inexpensive and effective protection against this tasteless, odorless potential hazard.
Confused?
Sure—so are many of the insulation contractors. You need to do a little research and locate a contractor who wants to discuss air leakage, bypass, and the thermal envelope. If a contractor doesn’t bring up these items, look for a better contractor.
Our homes are now complicated systems. Spraying a little insulation into the attic may not solve your heat loss and energy cost problems—it may even cause more problems. Proper thought and planning are essential in getting the job done right.