
Home Tips by Tom Feiza “Mr. Fix-It”
Simple, routine maintenance can keep your basement dry and prevent damage that requires costly repairs. Since most basement damage occurs slowly, over many years, you may not notice a problem until there is a water leak or a major crack. Let’s walk through the systems protecting your basement to see how they work and how to maintain them.
Sanitary And Storm Sewers
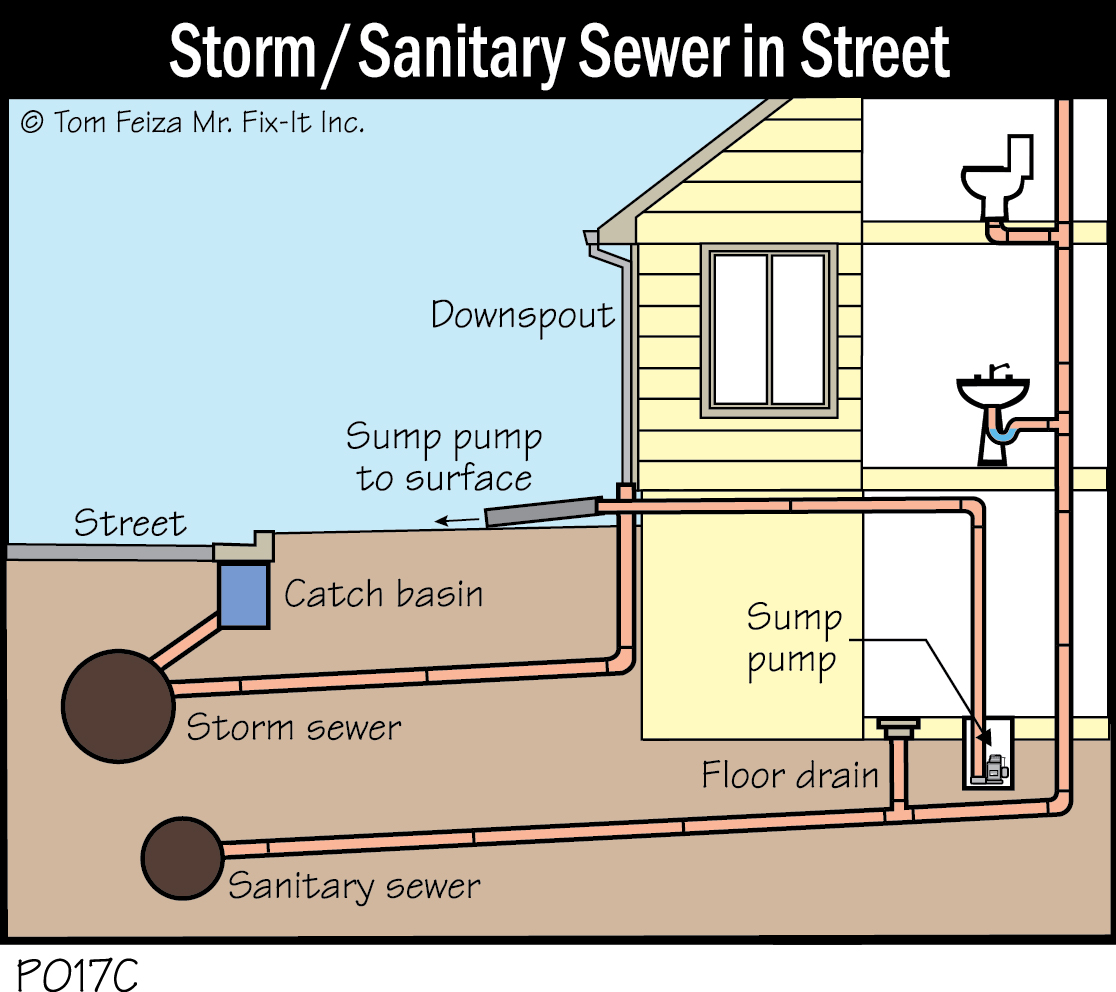
First, it helps to have a little background on the sewers that drain water away from your home. Most larger municipalities have two types of sewers, each built for a specific purpose. Sanitary sewers carry waste from sinks and bathroom fixtures to the sewage treatment plant. Storm sewers collect rain and surface water and carry it to lakes or rivers. (P017)
You may have a foundation (basement) drain tile system that is connected to the storm sewer or to the combined sanitary sewer. Combined sewers? Yes, older systems may have “combined” sewers in which sanitary and storm sewers are combined in the street or below the house. Most of these systems are being renovated to keep surface water out of the sanitary sewers. We don’t want to pay to treat rainwater, and we don’t want it flooding our sewer plants. However, many combined systems still exist. The City of Milwaukee’s deep tunnel system collects excess water from the combined sewers to help eliminate overflows into rivers and streams.
Your basement is connected to the sanitary sewer system at the floor drain or at basement plumbing fixtures. The system carries waste out of the house. As it reaches the street, the flow may travel downhill, aided by gravity, or it may be assisted by pumps. In either case, its final destination is the sewage treatment plant.
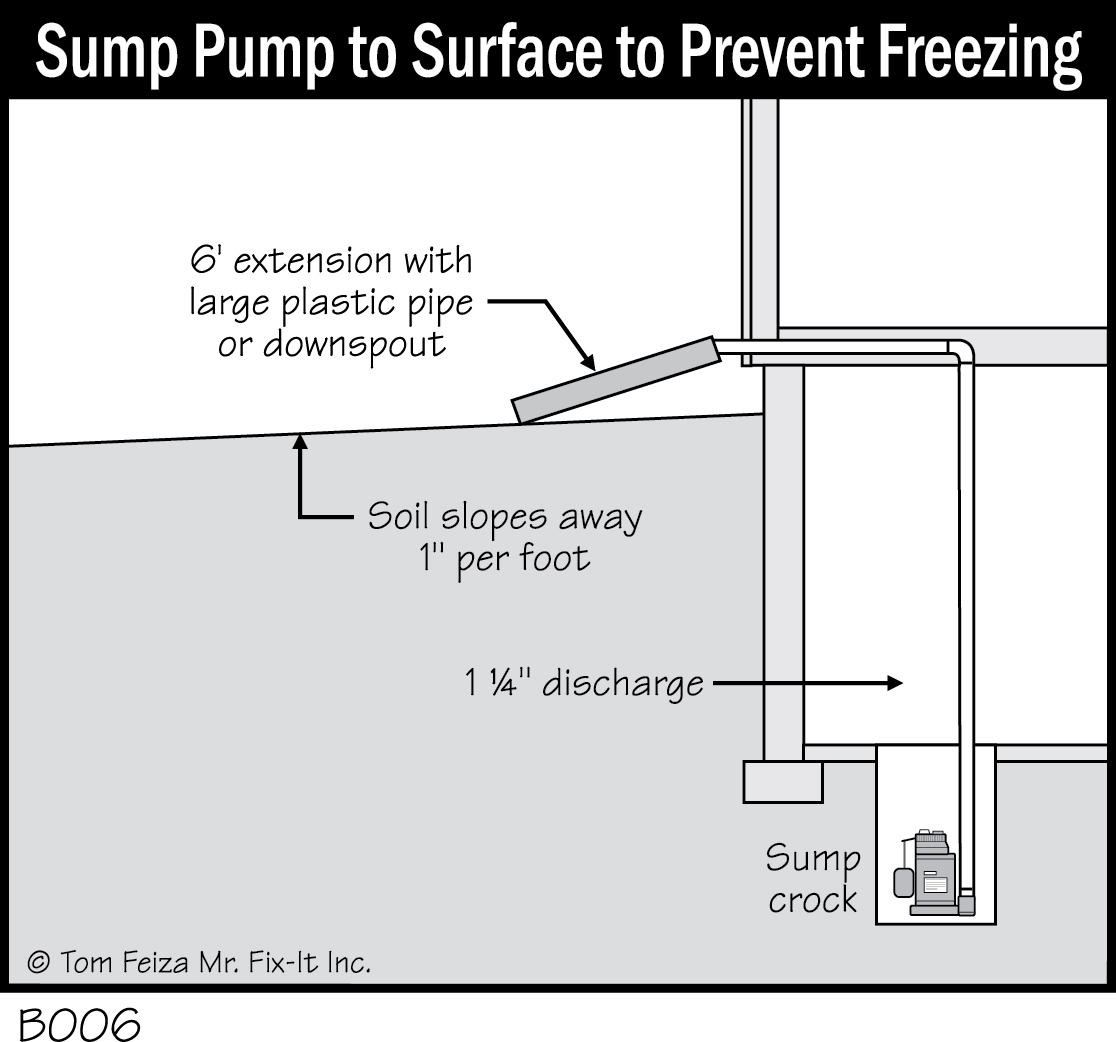
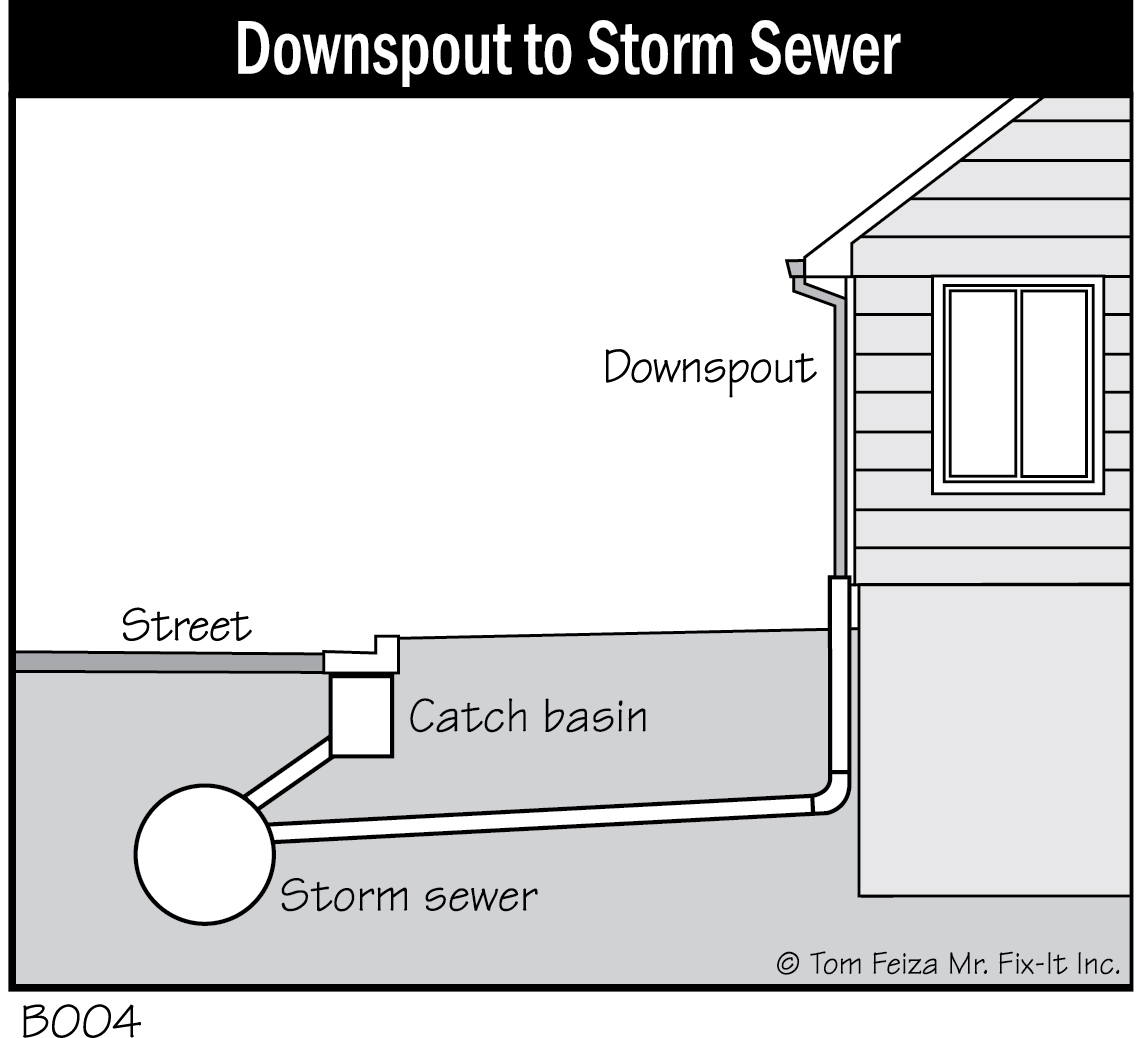
The storm sewer is connected to the sewer grates in the street and eventually dumps the clear water (rainwater) into rivers and streams. If you have a sump pump connected to a sewer line, it should be connected to the storm sewer. Downspouts and rain gutters that are routed into underground sewer lines should also be connected to the storm sewer. Some sump pumps will be routed to the surface soil; eventually the water flows to the storm sewer. (B006)
Protecting Your Basement: Drain Tile Systems
Older Homes – No Drain Tile Systems
Homes built around 1920 or earlier may not have drain tile systems. These homes were often built “high on the hill” with a shallow basement that simply depended on surface grading to divert water from the basement.
Drain Tiles, Bleeders, and Damp Proofing
Homes with drain tile systems share common components that collect and remove water. Exterior drain tiles are placed near or above the footings. These exterior tiles should be covered with at least 2 feet of gravel, allowing water to flow to the tiles. Older homes have concrete tiles; newer homes use perforated plastic pipe. Interior tiles receive water from exterior drain tiles via bleeders through the footings. Interior tiles route the water to a sump pump or palmer valve. (In the next section, we’ll take a closer look at the palmer valve.) To keep water out of the rest of the basement, a thin coating of tar or damp proofing is applied to the outside of the foundation when the house is built. Block basement walls are “backplastered “ with a thin concrete coating on the outside, under the damp proofing.
Homes Built From Around 1920 To 1950–Palmer Valves
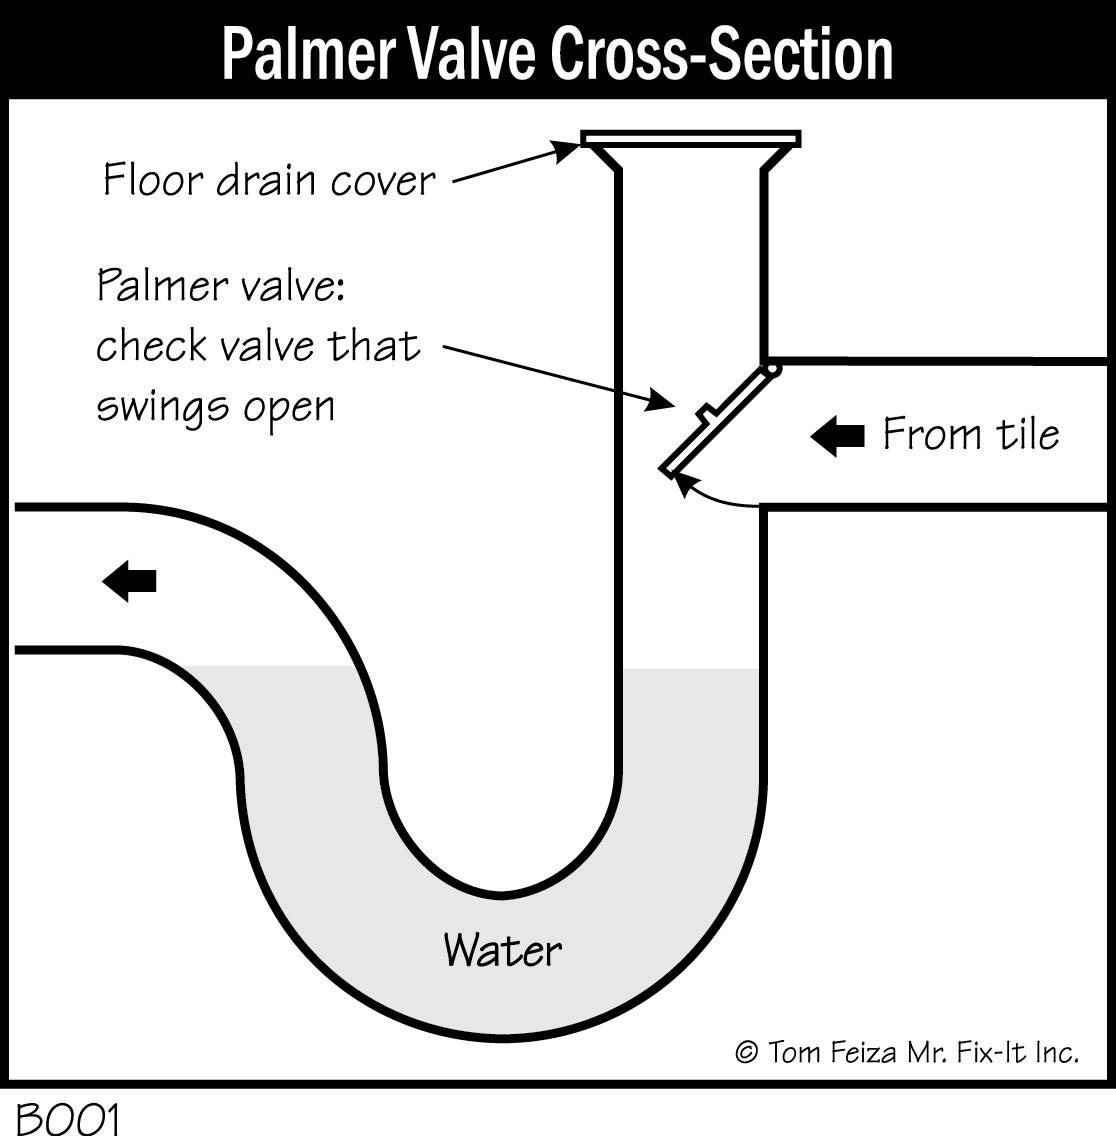
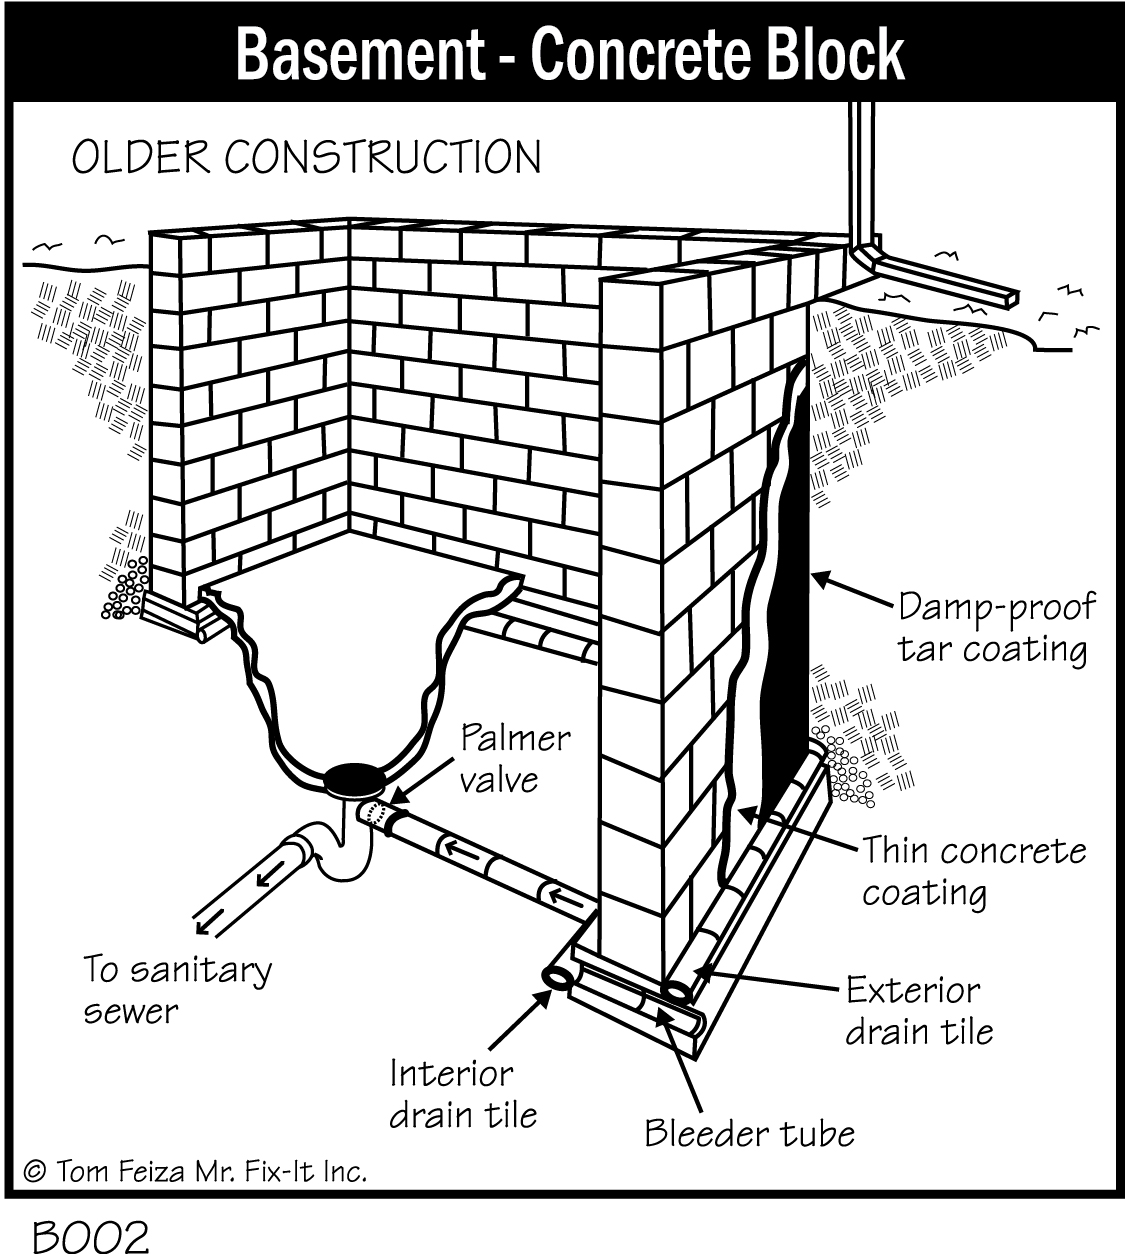
Early drain tile systems in municipal areas often were connected to the basement floor drain with a one-way check valve called a Palmer valve. Some municipalities require that this connection be eliminated because it drains storm water into the sanitary sewer. You need to maintain this Palmer valve by checking that it opens freely to discharge water.
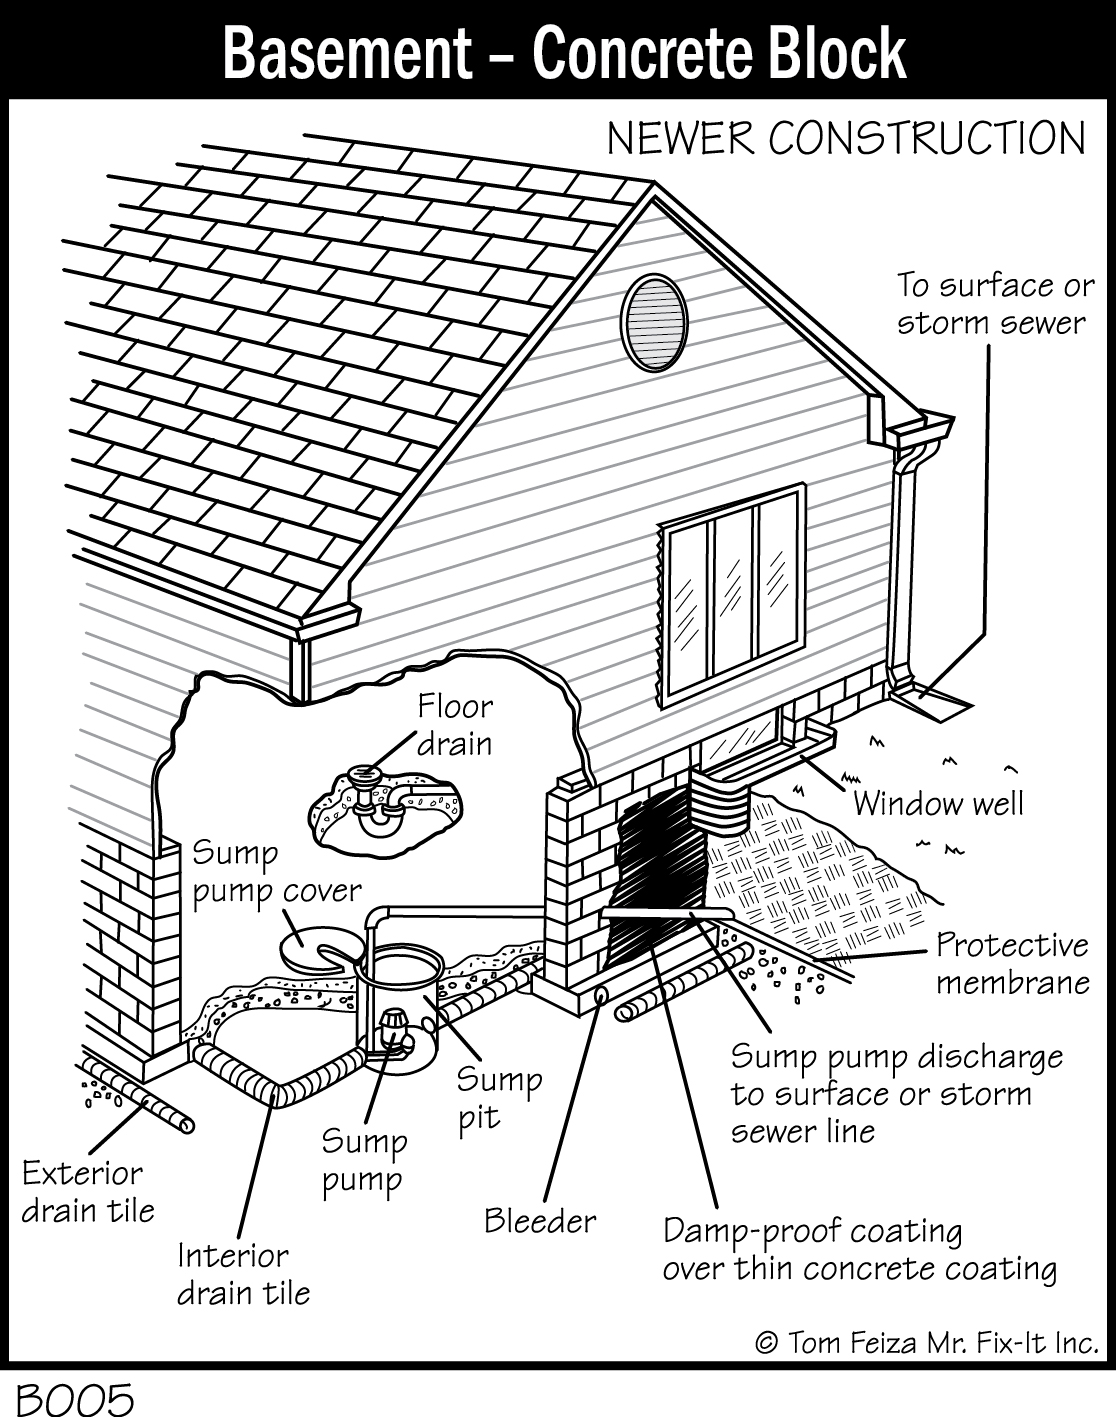
Homes Built After 1950–Sump Pumps (B005)
Newer homes have a sump pump that removes the storm water from the drain tile system and pumps it to an underground storm sewer line or to the surface soil.
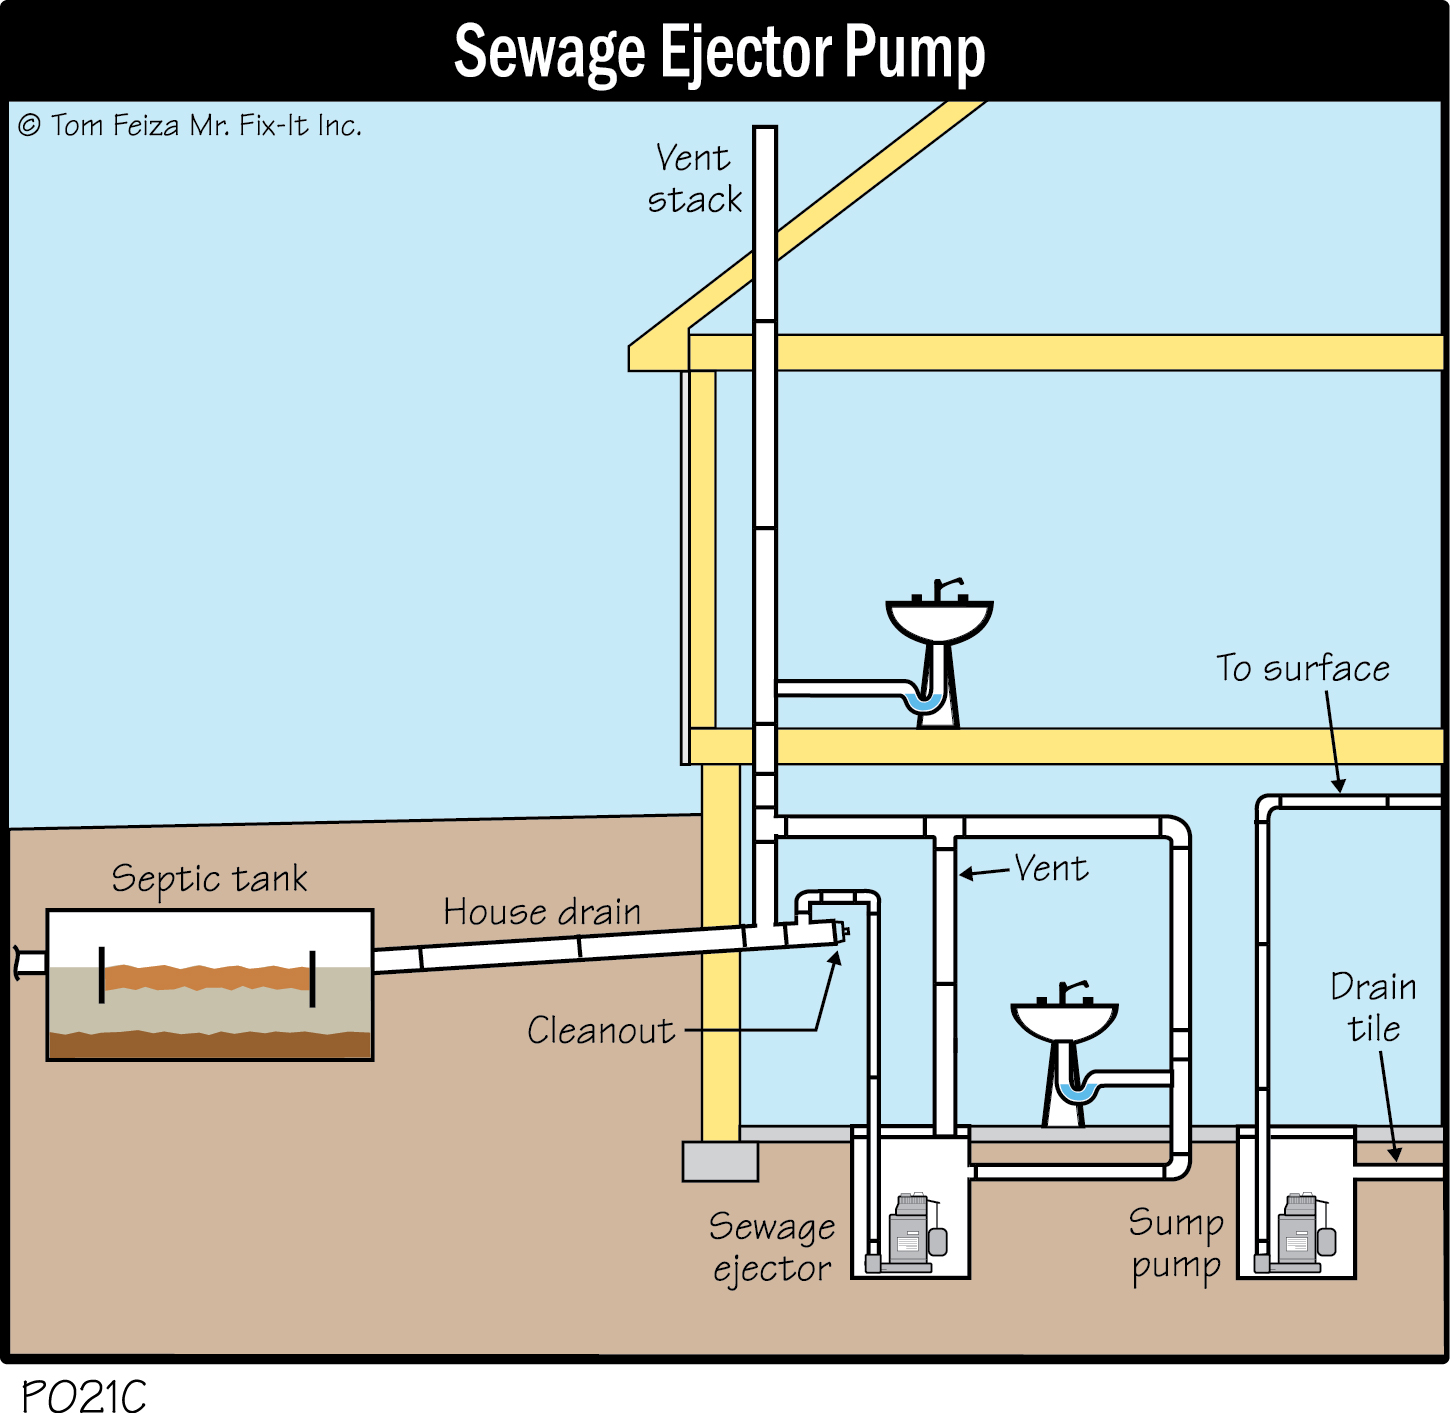
Rural Homes–Septic Systems, Basement Drainage
A home with a septic system simply has a private sewer treatment system. All the other principles of drainage are the same. Because the septic system’s drain exits the basement near the midpoint of the wall, the house may have a second pump crock to lift sanitary sewage from the floor drain and laundry tubs up to the septic drain line. Homes in rural areas don’t have storm sewers. All storm water is routed to the surface and to ditches. (P021)
How Sewage Backs Up Into Your Basement
If the sanitary sewage system backs up, your basement could be affected. The sanitary system can back up because of a blocked pipe from your home or a blocked pipe in the street, or because the combined sewers are blocked or overflowing.
When the sanitary or combined sewage system backs up, sewage will enter your home through the floor drain or any plumbing fixture. When a whole neighborhood experiences a sanitary sewer backup, it’s because a major sewage line is blocked or has more flow than it can handle. For instance, during a heavy rain, the combined sanitary and storm sewers may be unable to handle the sudden increased flow.
There is little you can do to prevent a neighborhood-wide sanitary sewer backup except to work with your local municipality to correct sewage system problems.
How Rainwater Backs Up Into Your Basement
If you have poor surface drainage or problems with gutters and downspouts, you are inviting rainwater into your basement. Drainage system are not designed to handle excessive surface water. If water floods around your basement, water will come in.
Water From The Sump Pump
Your house may have a sump pump. A sump pump is designed to collect the water from your basement drain tile system. Water can back up from this sump pump if the electrical power goes out, the flow is too great, the discharge is blocked, or the pump malfunctions. This storm water may overflow the sump pump crock, run down the floor drain into the sanitary sewer, and/or flood your basement.
Water From The Walls, Window Wells, Cracks, And Floors
Water may leak into your basement because of poor surface grading or problems with gutters, downspouts, and sump pump discharges. Leaks can also be caused by problems with the Palmer valve, drain tile, storm sewer lines, or window wells.
Symptoms Of Drainage Problems
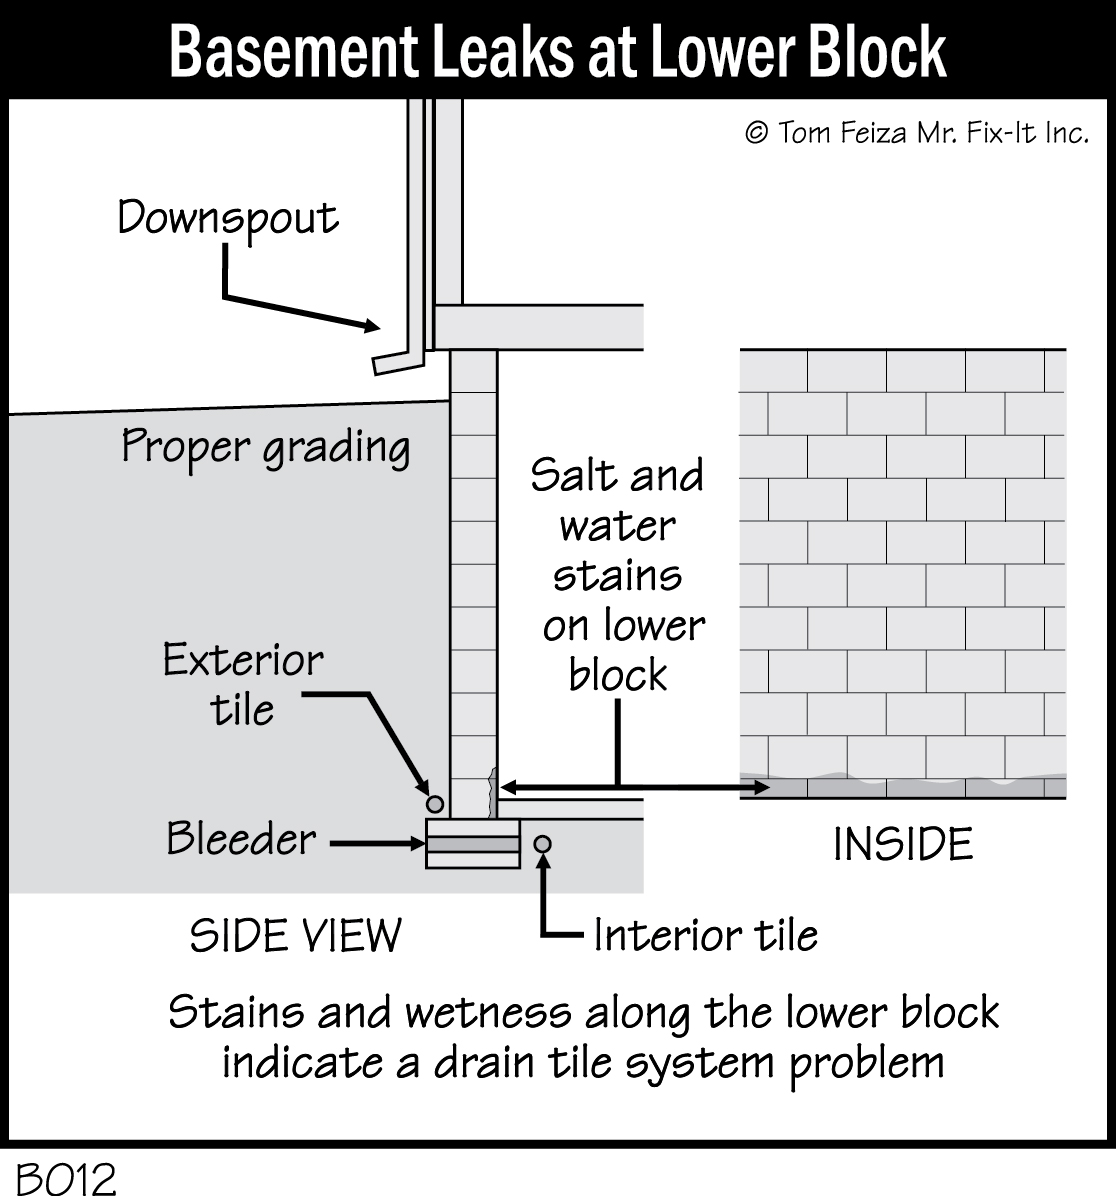
- Active water leaks near the basement floor indicate problems with drain tile and surface drainage. (B012)
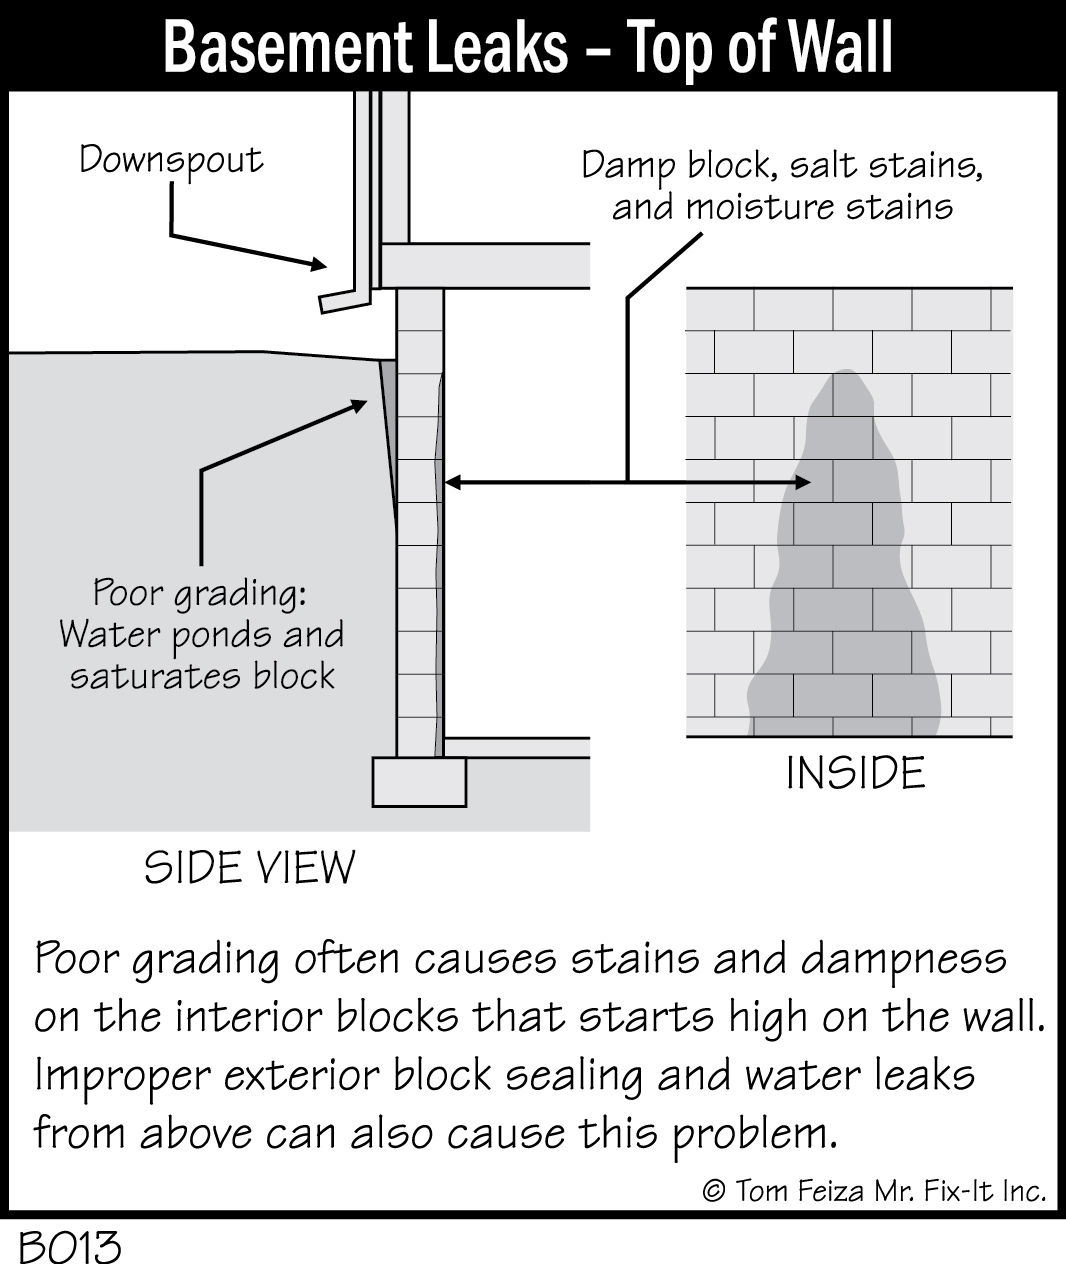
- Active water leaks higher on the wall usually indicate a surface water drainage problem or a broken drain or supply line. A problem with window or door flashing, windowsills, a roof leak, or brick veneer could also cause a leak on a basement wall. (B013)
- Efflorescence or salt stains indicate that water is pushing through the masonry surface and depositing these white or tan salt stains.
- Water stains, damp spots, mildew, and chipping/splintering of masonry indicate that water is pushing through the masonry.
- Dampness, odor, mold, mildew, and condensation indicate that water is pushing through surfaces or leaking into the structure. High levels of moisture in basement air can also cause these problems.
- Wood rot, wood movement, and stains on wood and drywall indicate leaks and moisture behind finishes
- Cracks and wall movement may indicate an unstable foundation wall caused by drainage problems.
- Damp walls and floors with a dry sump pump crock indicate a drain tile or sump pump problem.
- Roots in the sump crock indicate a potentially serious drain tile blockage and drainage problem.
Avoiding And Correcting Problems
You can avoid or solve most basement seepage problems by following these simple corrective steps, which are listed in order of priority.
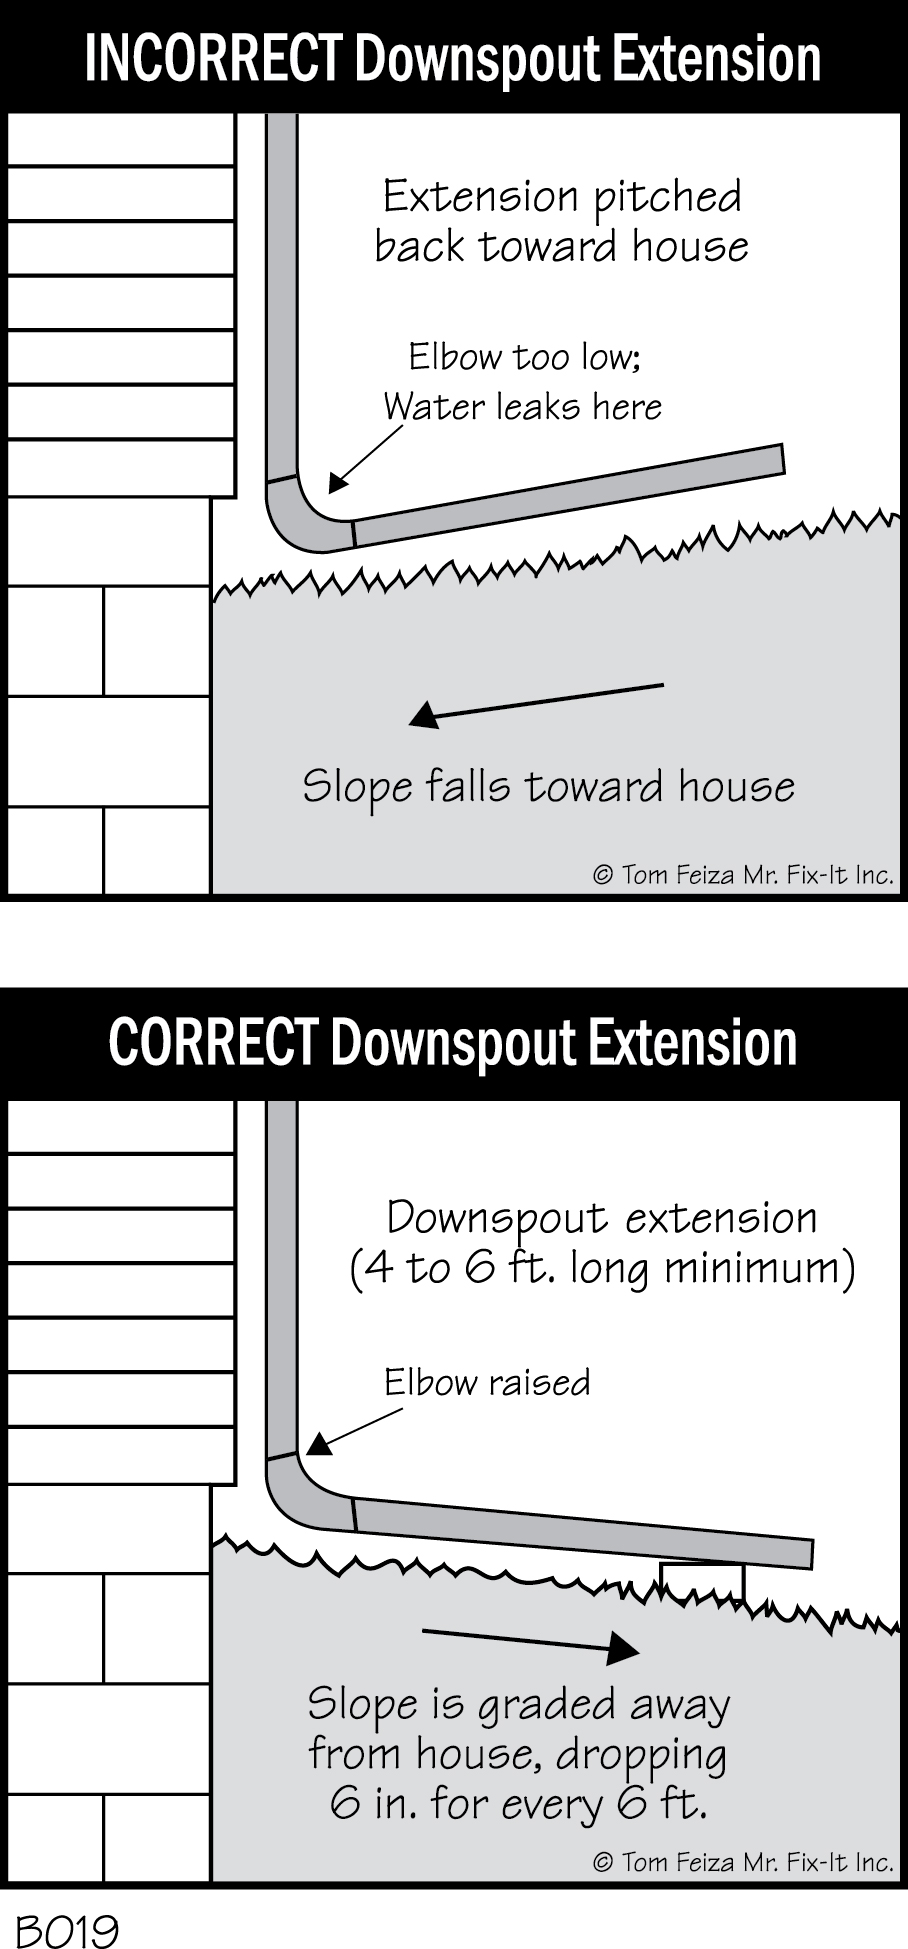
- Keep gutters and downspouts clean, and direct them away from the basement. Downspouts must be routed to a storm sewer or at least 6 feet away from the foundation to an area where the water will flow away naturally. (B019)
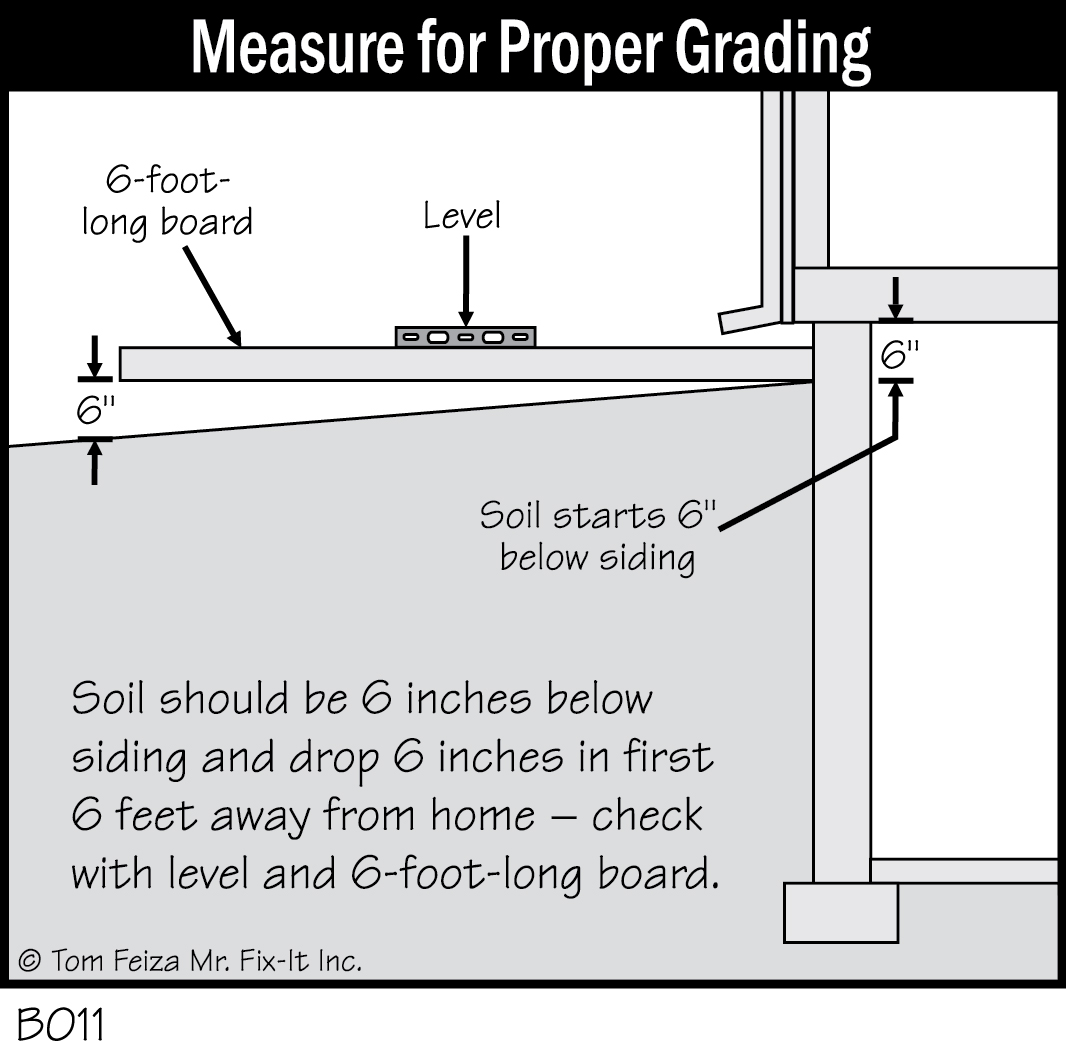
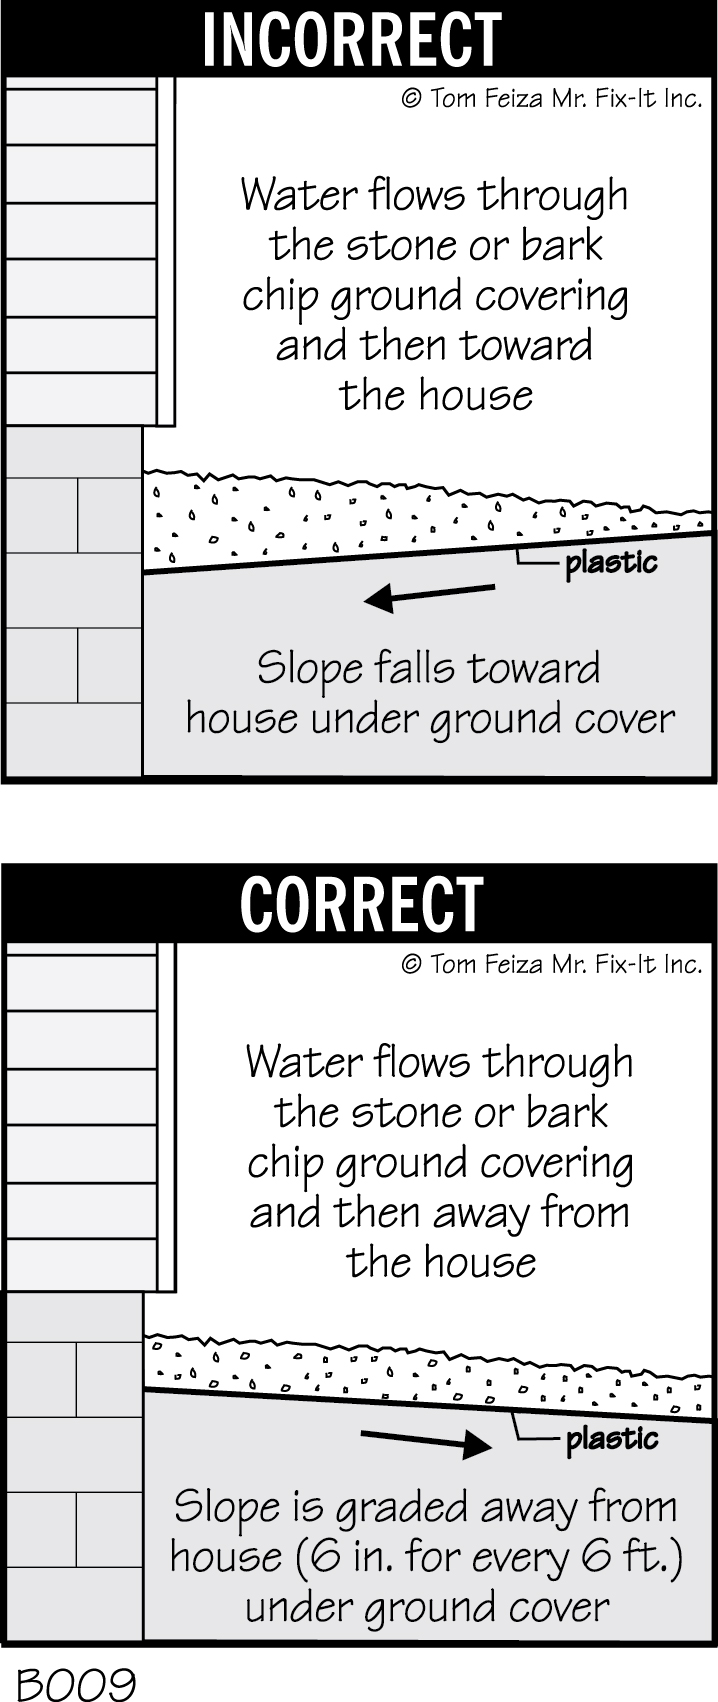
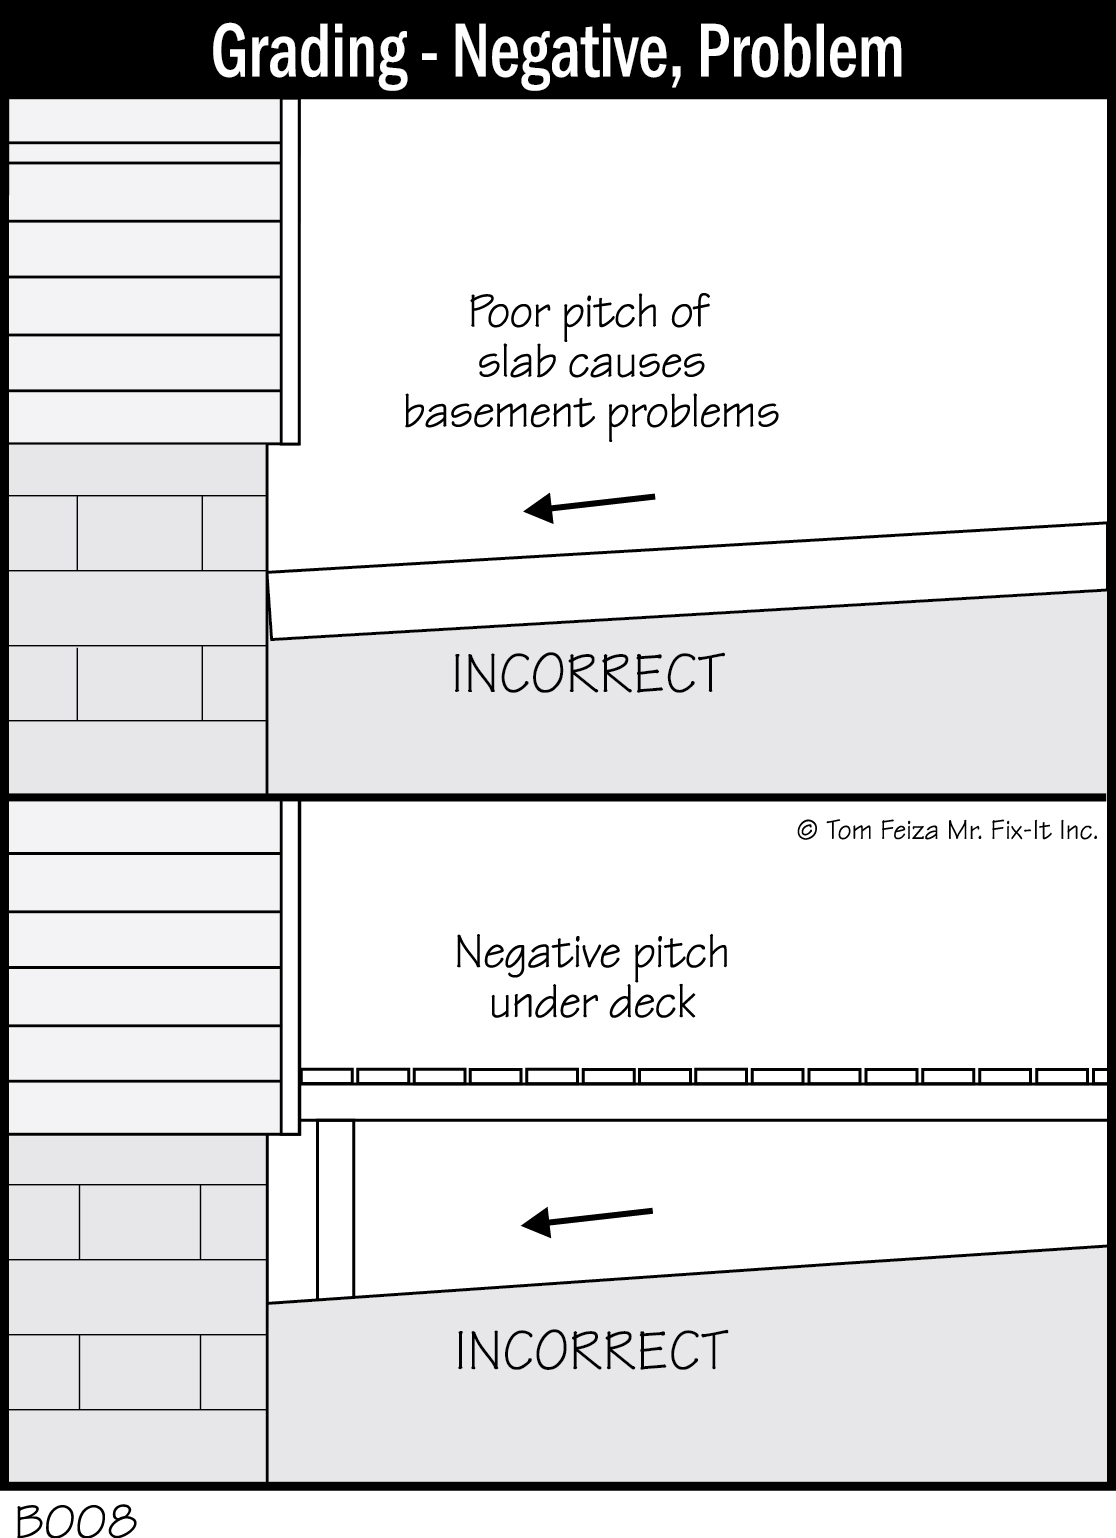
- Grade soft surfaces. All surface water must flow away from foundation walls. Soil should pitch away from the basement, dropping 6 inches for every 6 feet. The soil under any bark or stone mulch around your home must pitch away; ideally, any plastic under the mulch will pitch away, too. Check under decks and porches. During a heavy rain, walk around your home to check for pooling water. No water should pool around or flow toward your basement walls. (B011, B009, B008)
- Grade hard surfaces. All concrete and asphalt surfaces must pitch away from the basement. Watch for slab concrete beneath decks. Check all stoops, drives, and walks.
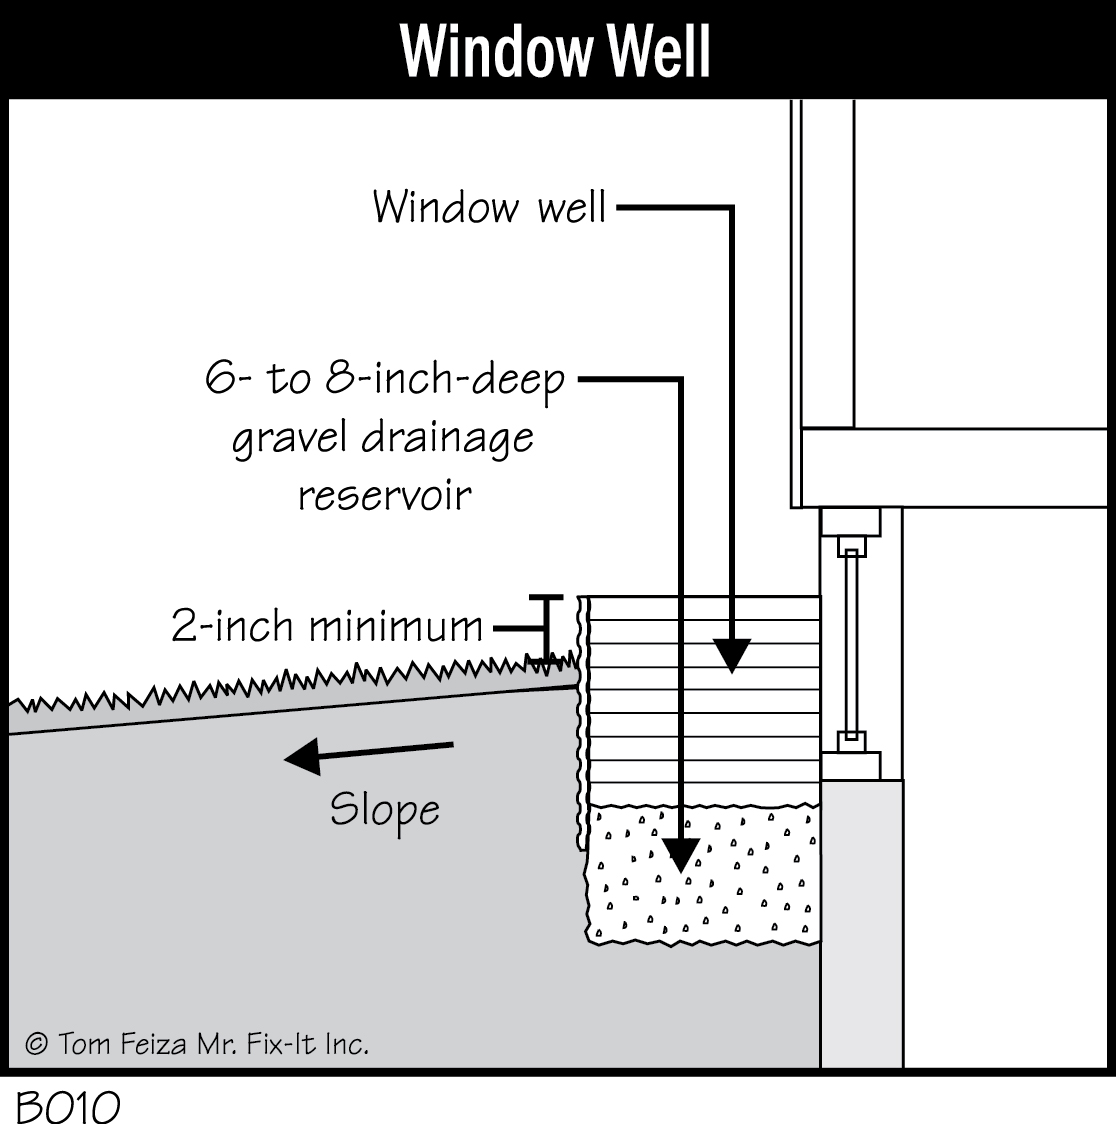
- Grade the soil around window wells to direct water away. Seal the window well tightly to the foundation, and keep the inside of the well clean. The inside of the window well should have a base of 6 to 18 inches of gravel–not mud. Also, the window well should either have its own drain or should flow into the exterior drain tile system through the gravel base. (B010)
- Check the Palmer valve. This check valve must swing open easily to drain water from the drain tile system. If it is stuck closed, water may back up in your basement, and eventually the drain tiles will become plugged with debris. Use a wire to hook the bottom of this round flap valve; it should swing upward on a hinge at the top of the disc. If the valve is stuck, free it with penetrating oil and a pry bar.
- Check the sump pump. The float must easily move up and down to activate the pump. If the float sticks, you will have a flood. Make sure that the pump is secure and will not allow the float to stick to the sides of the crock or the cover. Lift the float to check that the pump will remove water from the crock; the pump should switch on when the float is 8 to 12 inches from the top of the crock. If the pump allows higher water levels than this, seepage near the floor may occur. Replace a sump pump that is old and worn. If your pump runs often, have a spare sump pump handy.
- Look for gaps and cracks in joints. These can allow water to seep next to the basement. The gaps can be filled with a backer rod and concrete joint filler.
- Check for cracks in poured concrete walls or block walls. These should be evaluated and patched by a professional
- Check for problems with underground storm drain lines. If damp spots and seepage appear near a sump pump or downspout storm sewer line, the problem may be a broken or plugged underground line. You can test this line by running water into the pipe with a hose and watching for seepage in the basement. You can also temporarily abandon the underground line and route the sump pump or downspout to the surface, well away from your home. If seepage no longer appears in the basement, you’ll know the problem is a broken drain line. (B004)
- Investigate underground water supply lines. If seepage occurs near the water main into your home, suspect a broken underground water line.
- Investigate all homeowner-installed underground drain lines. Often they are unable to withstand freezing because they are installed too near the surface and/or they’re made of improper materials easily broken by frost. Also, many such lines can’t effectively carry water away from the foundation because they have poor pitch or are undersized. Temporarily abandon these lines to test them. If you see water bubbling up from connections to these lines, you have a problem.
- Watch for roots in the sump pump crock. Roots inside the crock mean there are roots in the bleeders and in the outside drain tiles. An expert should evaluate this problem.
Before Major Repair, Test Drain Tiles
Continued seepage may indicate damaged or missing drain tiles, but don’t ever start a major repair without first evaluating the interior and exterior drain tiles. These tests cost about $400.
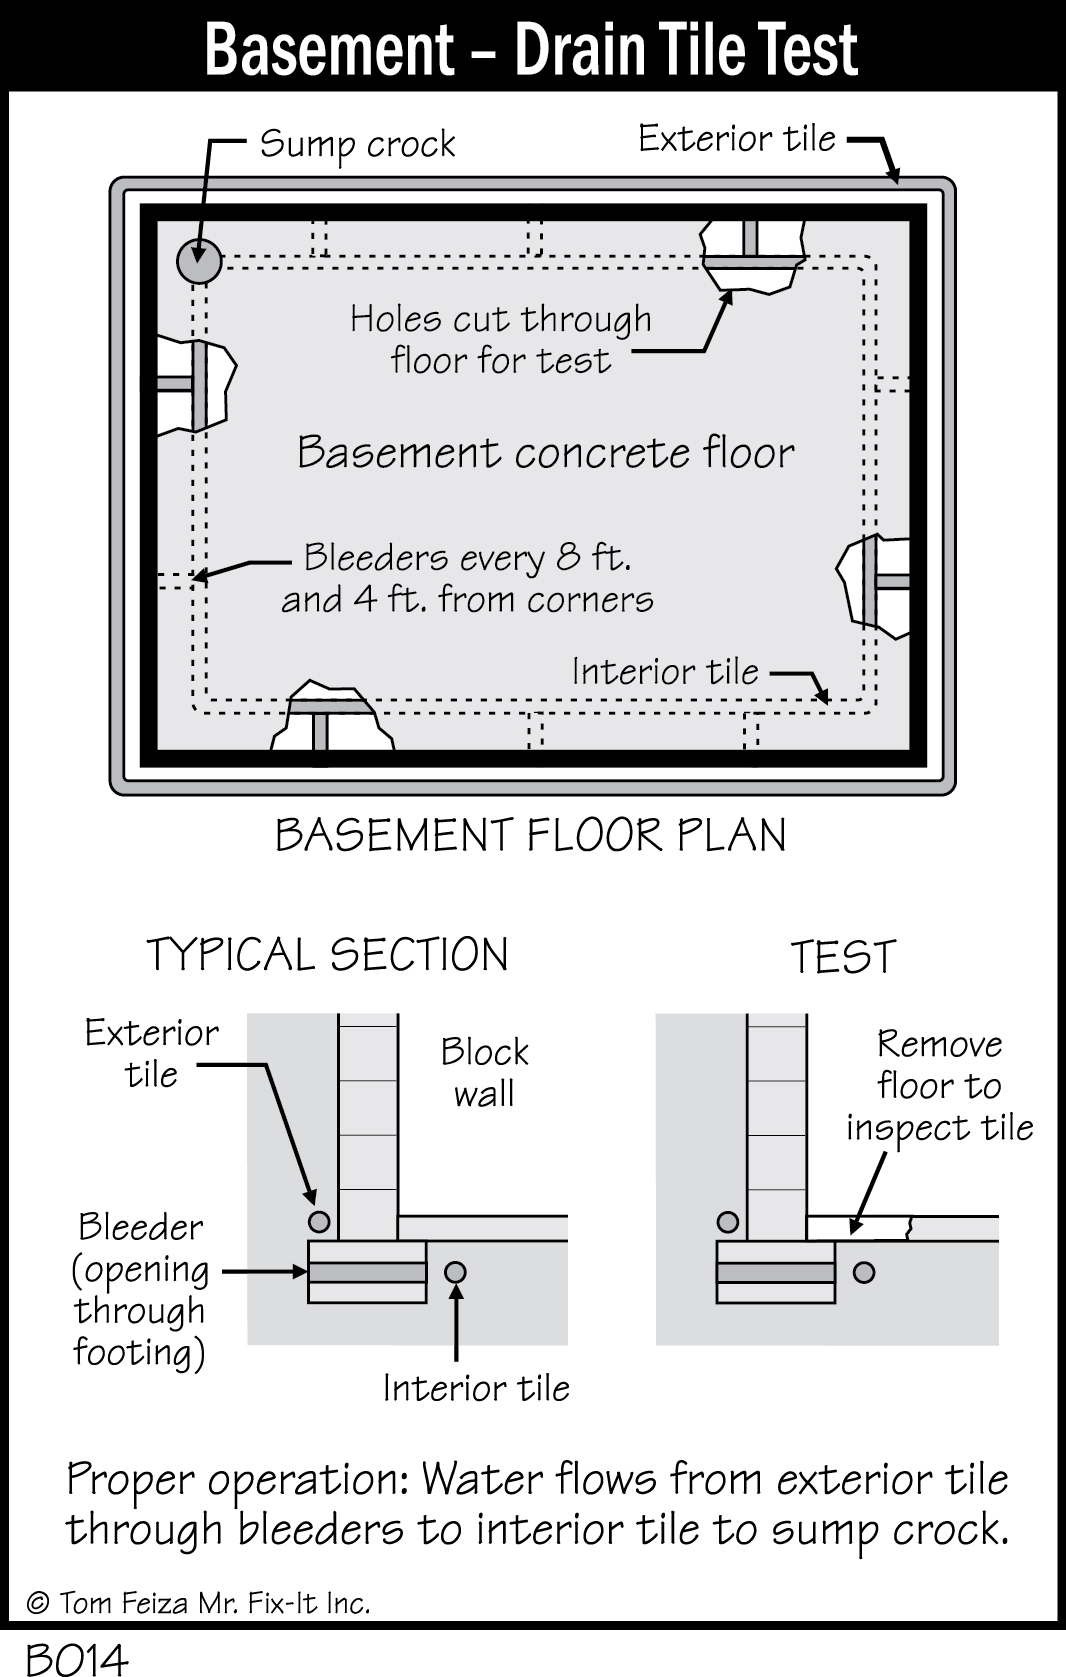
An interior drain tile test involves cutting several holes in the basement floor to expose the interior drain tiles and bleeders in several areas so they can be inspected for debris and water flow. (B014)
Exterior drain tiles can be tested with a “water spud.” This is a small-diameter pipe that looks like a tree root fertilizer tool. The pipe is inserted in the ground next to the foundation. Water is forced into the ground through the pipe, and the flow is traced into the drain tiles. If tiles are blocked, water will appear on the basement walls and at the wall/floor joint.
Knowing When You Need An Expert
If leakage continues after you complete all the simple maintenance steps, have your basement evaluated by an expert. You also need an expert if you discover wall and floor cracks associated with the leaks. Find a consultant who is not connected with a basement repair company. You want someone who is selling consulting services, not basement repairs.
Don’t make a quick decision on a basement repair contractor. Always check references and find a member of a professional contractor group. Don’t buy a repair because it is “on sale today.” Your basement will not fall apart overnight because of a leak.
Above all, maintain your basement. The maintenance steps are simple and can help prevent small problems from escalating into serious damage.